
Exploring the West and Central Summits of Castle Towers in Garibaldi Provincial Park, BC
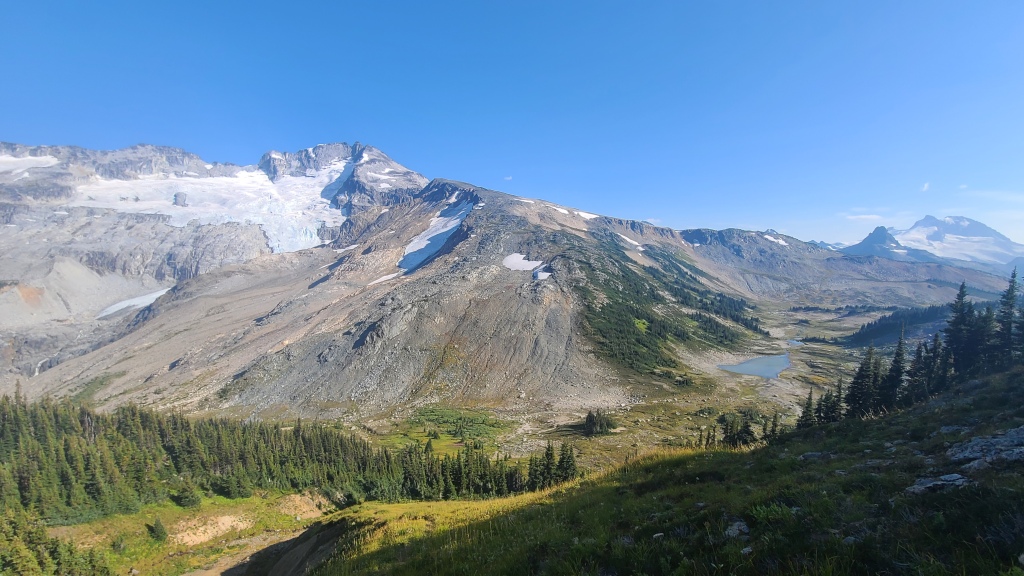
Near the end of August, our flight from forest fire smoke found us near Whistler, in beautiful British Colombia, with only light smoke from the worst forest fire season on record tainting the air. As campsites for the upcoming weekend were fully booked for the entire region, we decided to disappear into the backcountry for a few nights, and tackle a project that had long been on Chris’s list: Castle Towers, far behind Garibaldi Lake. As we had the time, we decided to complete the trip over three days (two nights), but some people famously do the whole route in one long and very painful day. Castle Towers is named after the three towers at its summit; the west summit is most often climbed, as a good route description in Matt Gunn’s scrambles guidebook have made this route somewhat popular. We’d be aiming to continue past this and climb the central summit (sometimes called the east summit), which is the true summit.
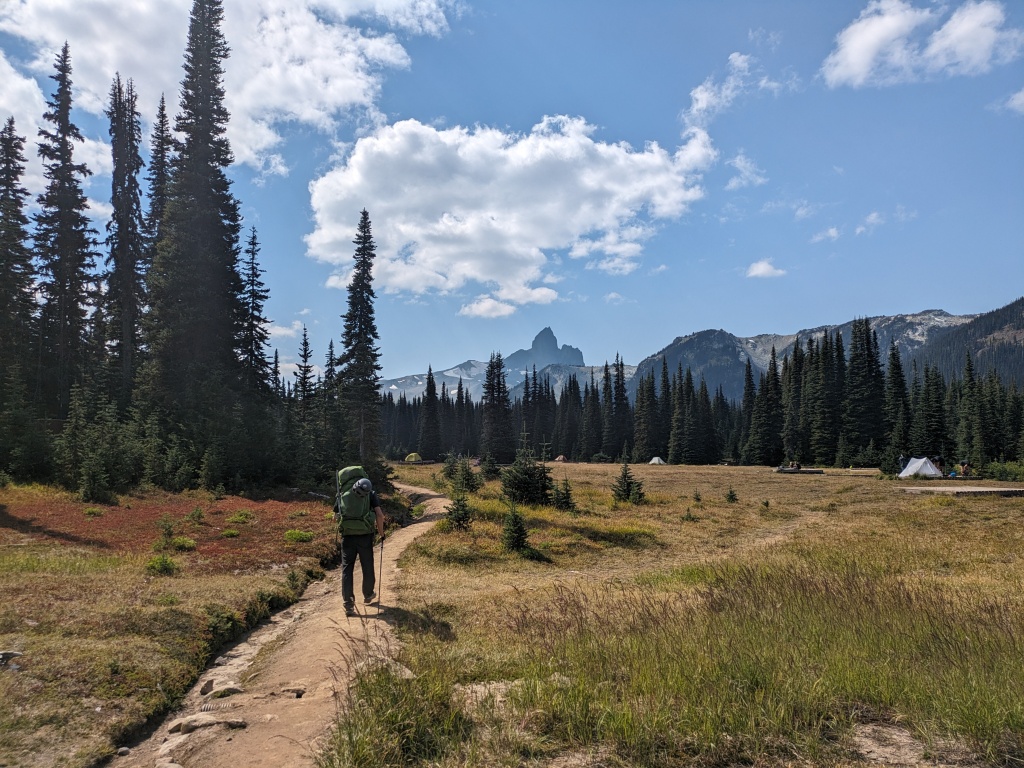
We departed from the Cheakamus Lake trailhead in Whistler – turning off the highway at the Whistler Interpretive Forest (across from Function Junction), a gravel FSR leads past many biking and hiking trails to end in a small lot and trailhead. While the road is a little bumpy and dusty, our 2WD low-clearance car made it with zero issues. From here, follow the trail towards the popular Helm Creek Campground, which is about 8 km in from the lot. After a quick lunch, we continued through the campsite through the alpine meadows. Soon afterwards, a small trail branches off the path on the lefthand side, heading due south between Helm Peak and Cinder Cone. The path cuts in and out a bit, but it is easy terrain to cross, even without a path.
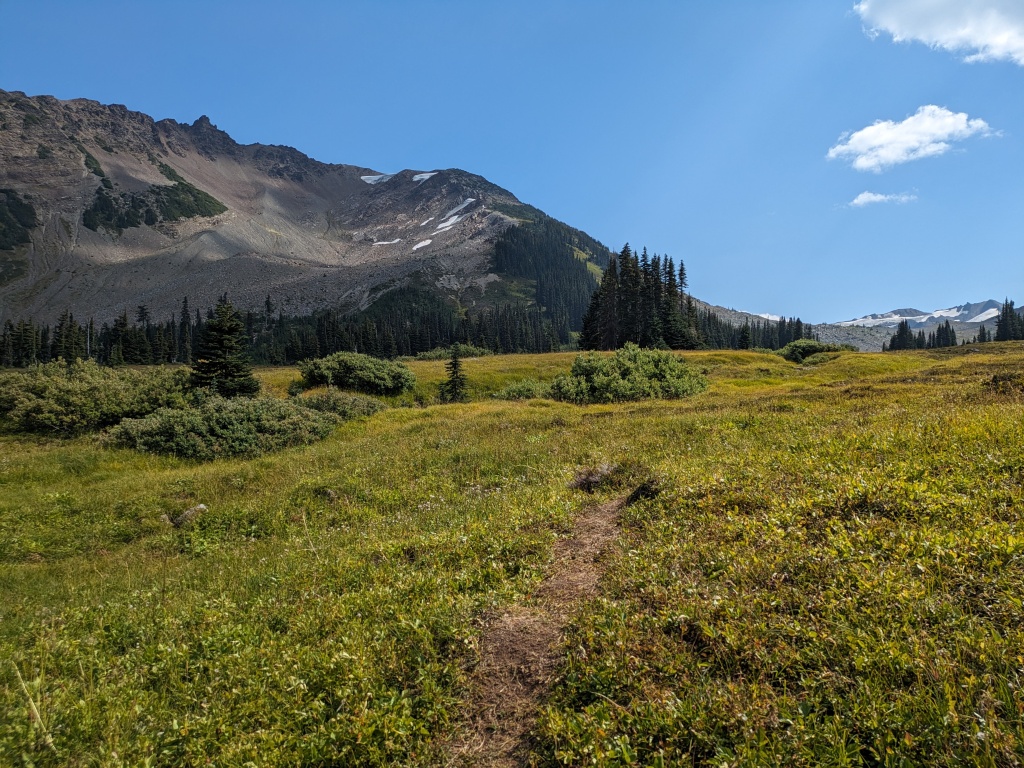
From the valley, the next step is to climb up to the low point on Gentian ridge, keeping below the summit of Gentian. There are two common routes to do this: a straightforward but technical walk up Helm Glacier, or a more roundabout hike up to the ridge connecting Helm and Gentian. We tried both routes, and generally agree with the consensus we found online: the glacier is straightforward with no route finding, but requires crampons, ice axe, and crevasse rescue and glacier travel training, and has more objective hazards (crevasses and rockfall), while the ridge is non-technical, but will add more elevation gain and time, as well as a bit of judgement and route finding to pick the best path.
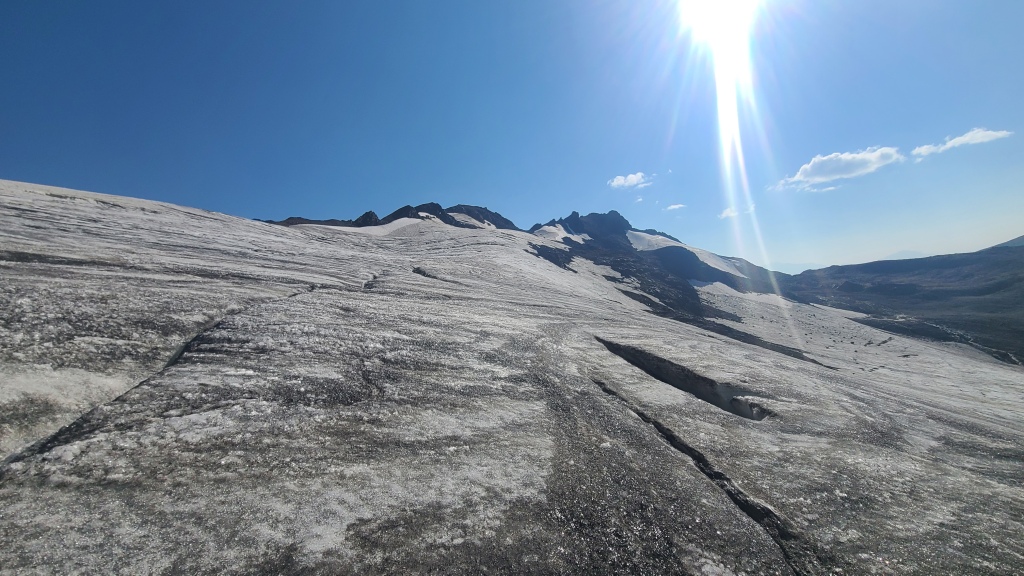
We took Helm Glacier on the way up. Stopping briefly to fill our water bottles at the lake at its toe and put on our ice-gear, we found the trudge up the ice to be a bit of a slog. As it was late August of a very hot year with an unusually thin snowpack, we did not rope up; the glacier was bare ice with all crevasses exposed. It was a simple enough matter to walk up – sometimes end-running of the crevasses was necessary – but with the extra weight of the ice gear and mountaineering boots for our crampons, we felt considerably slower than we had on the rest of the trail in light trail runners. Fortunately, the glacier is quite mellow. Keeping on the far lefthand side, with a healthy distance from the loose cliffs above for rockfall, we took a very reasonable path that never exceeded 30 degrees. The whole glacier ascent took us about 1.5 hours.
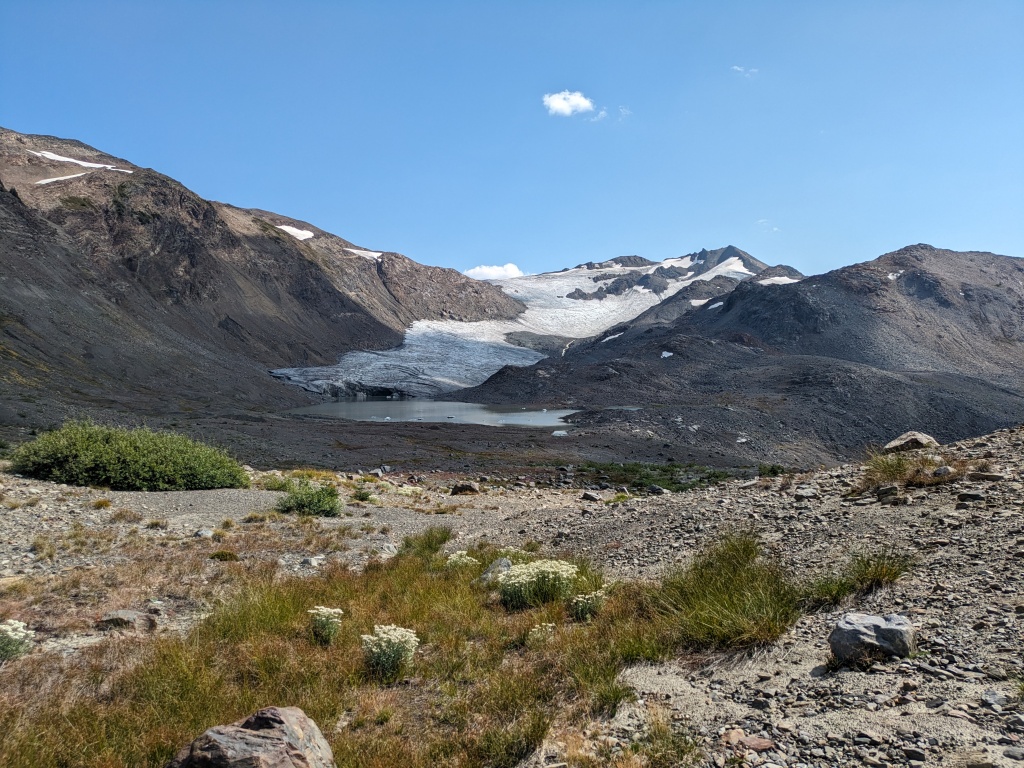
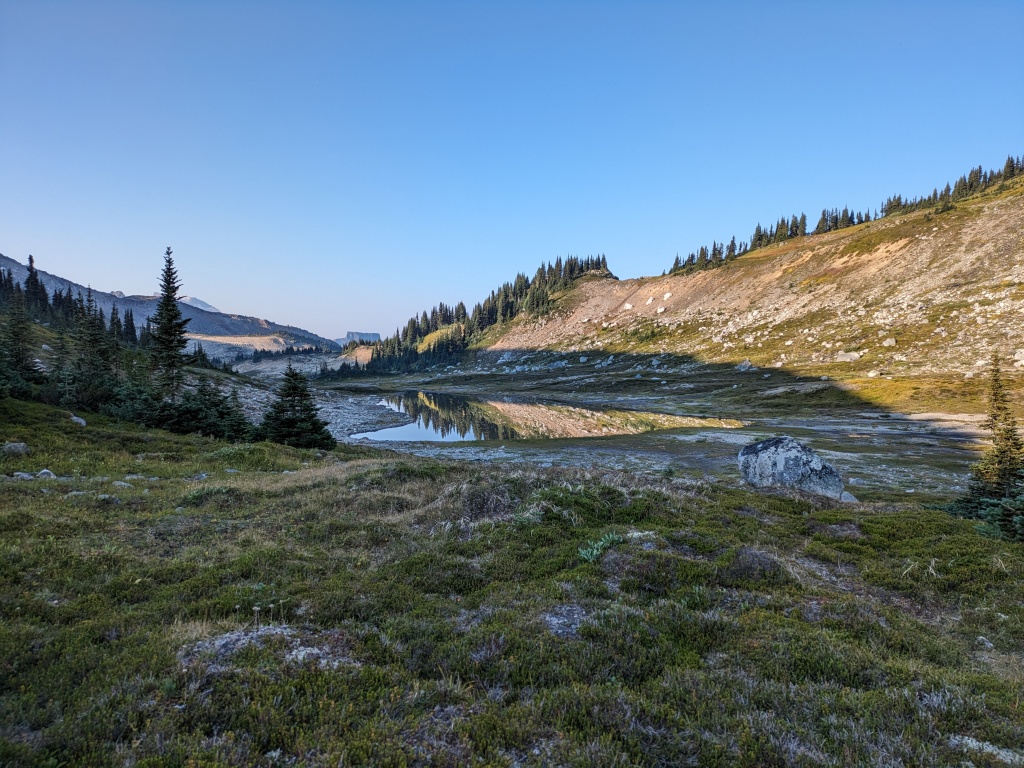
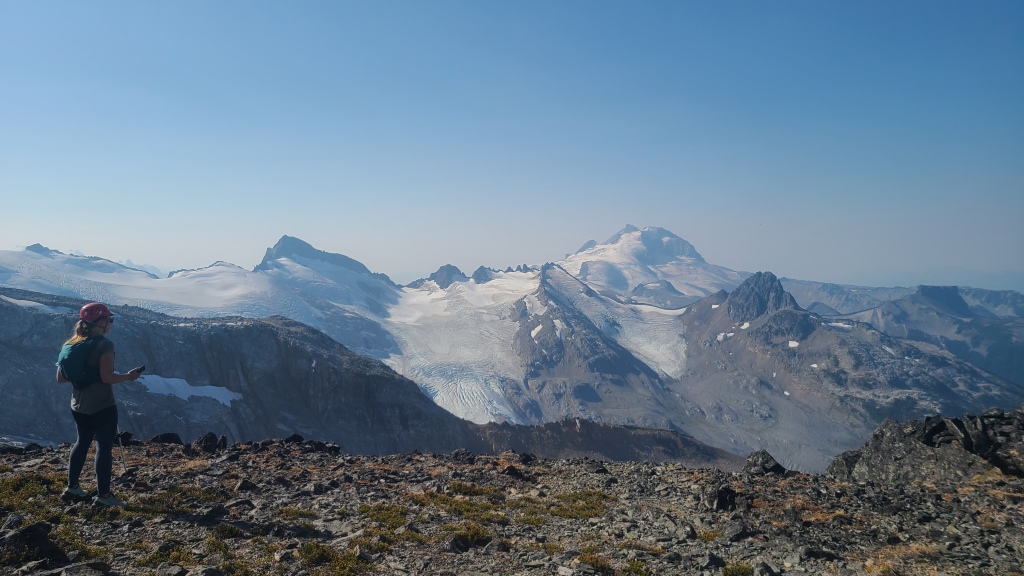
At the top of the ridge, we paused to soak in our first view of Castle Towers in front of us, the three summit towers soaring out of a blue-white glacial blanket. Gentian Pass lay before our feet, emerald grass and sparkling lake beckoning. To our right, the ridge led up to increasingly sharp rock at the feet of Gentian Peak. And behind us, the iconic pyramid of Black Tusk loomed across the valley. We stowed our ice gear, and began the final leg of the day, a 250 meter descent into Gentian Pass to our planned bivy site. We followed faint paths down the steep slope, just right of a deep, dry creek bed. Loose dirt and rock quickly gave way to alpine shrubs and grass, then trees, then muddy and lush riparian river plants as we neared the floor of the pass. In no time at all, we were down and selecting the least mosquito-y campsite we could possibly find in the vicinity of the lake. The day had been scorching hot, and after setting up camp, I cooled off with a quick dip in the lake. Unfortunately, the water was too shallow for a proper swim, but it was still cool enough to be refreshing. Our total stats for the first day were about 1300 m of elevation gain over 15 km, which took us about 5.5 hours. Note that Gentian Pass is classified as the ‘Garibaldi wilderness‘ – you are able to camp anywhere in this zone (practicing ‘leave no trace’ of course), but you must obtain a wilderness permit for each night from the BC Parks website first. The rangers will check that you have a valid camping permit in the parking lots in the high season (note that you don’t require a day pass as well if you’ve got a valid camping permit, including wilderness camping). The wilderness camping pass costs $10 per person per night, plus a $6 per night reservation fee (so $26/night for the two of us).
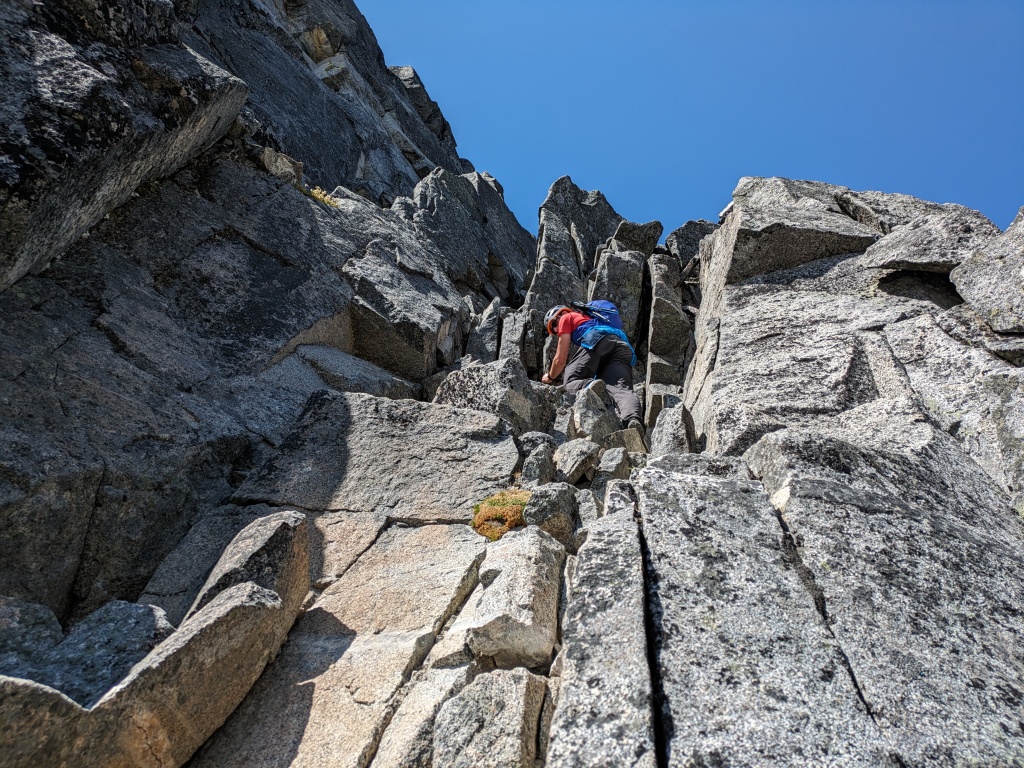
The morning of the second day dawned as hot and smokey as the first. We slept in a little (ah, the joys of sleeping right beside the start of your objective!), and hit the trail at a leisurely 9 am. We followed footpaths from our campsite up the gentle Polemonium Ridge, losing and re-finding them occasionally. The terrain is easy to climb even without a path however, as it’s low-angle and shrubby. In under an hour, we were at the very top of Polemonium Ridge. From here, a series of small peaks and notches lies below your feet, leading up to the base of the climb up to the west summit of Castle Towers. A few small sections of scrambling are encountered as you pass through these notches. A decent dirt path is visible, supplemented by cairns. Taking the route that looks most well-travelled won’t steer you wrong. Generally, you’ll descend from Polemonium, trending right, and skirt around the edge of some of the steeper rock. Then you’ll climb up to the base of a boulder field to begin the west summit trek. The scrambling is gentle here, and all class 3. There’s one fun ledge scramble with some climbing moves, but it’s easy and not exposed.
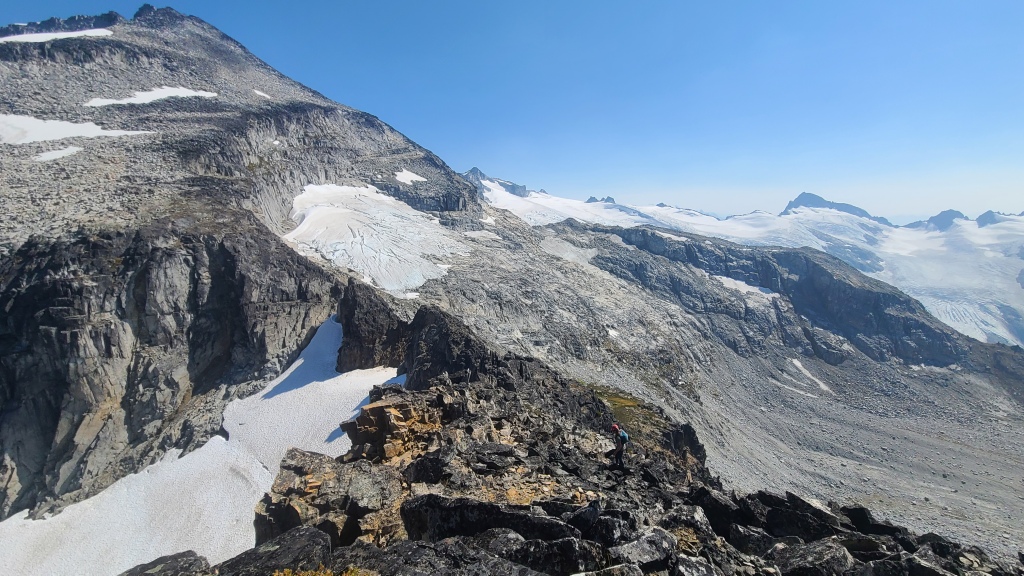
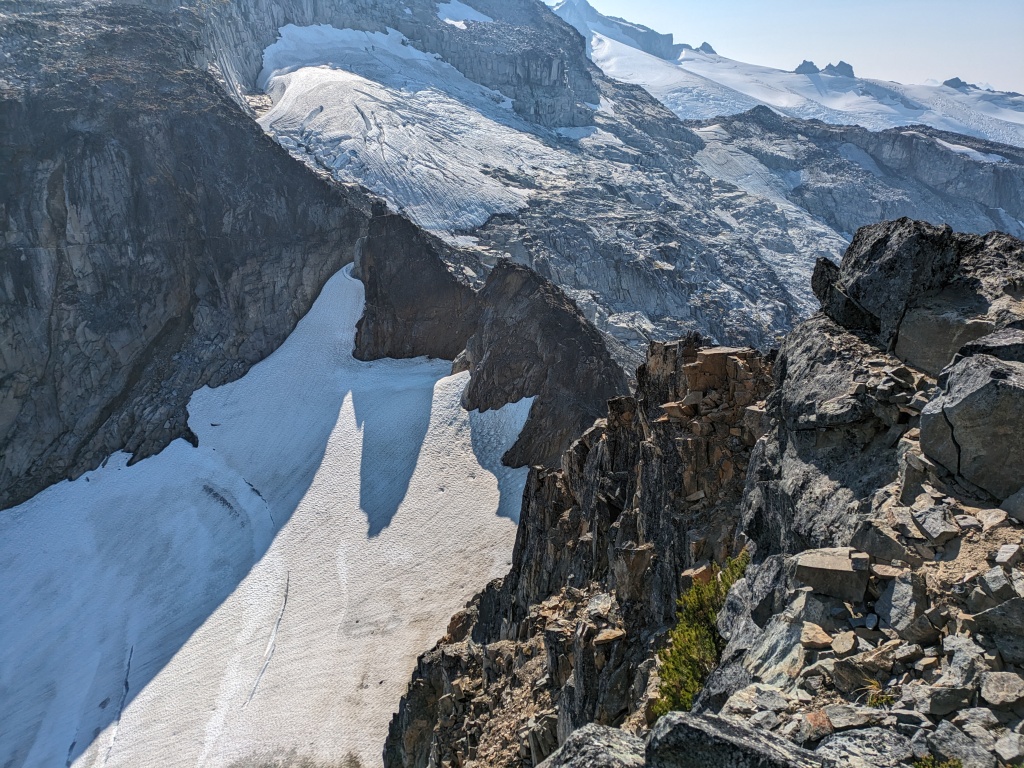
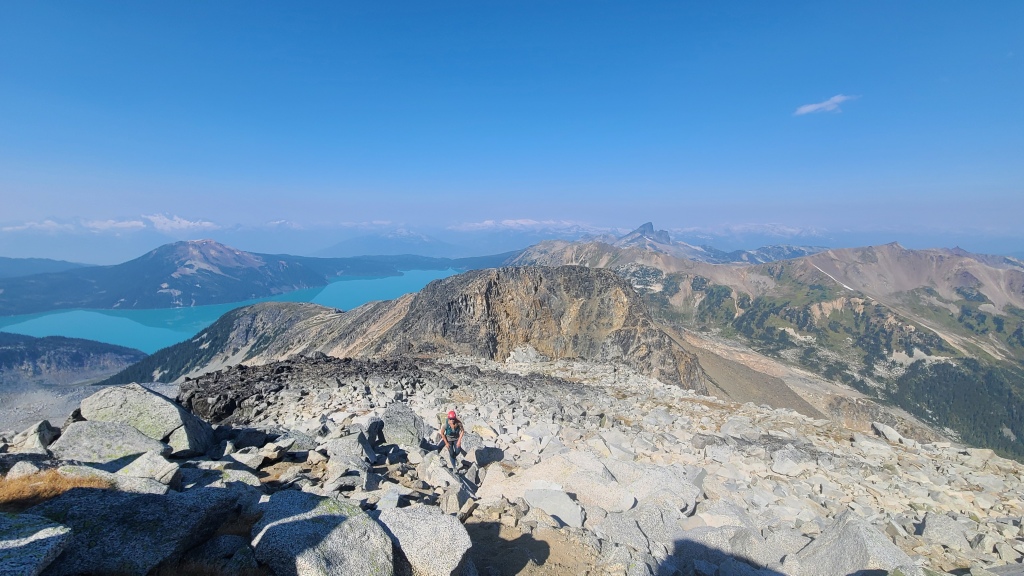
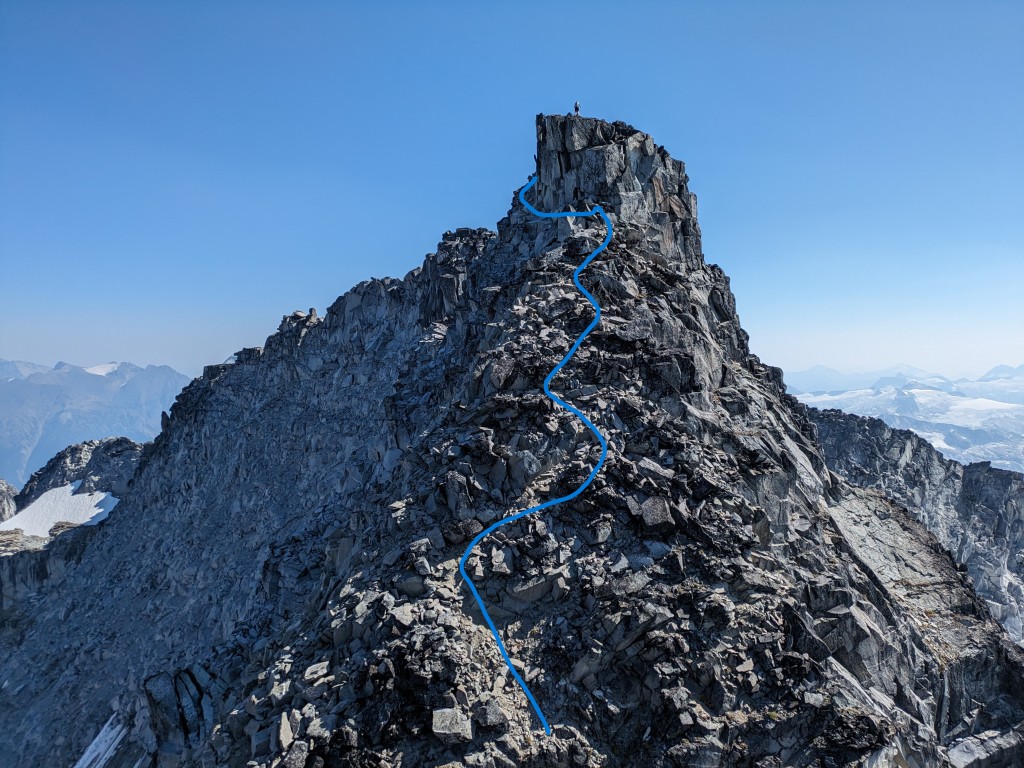
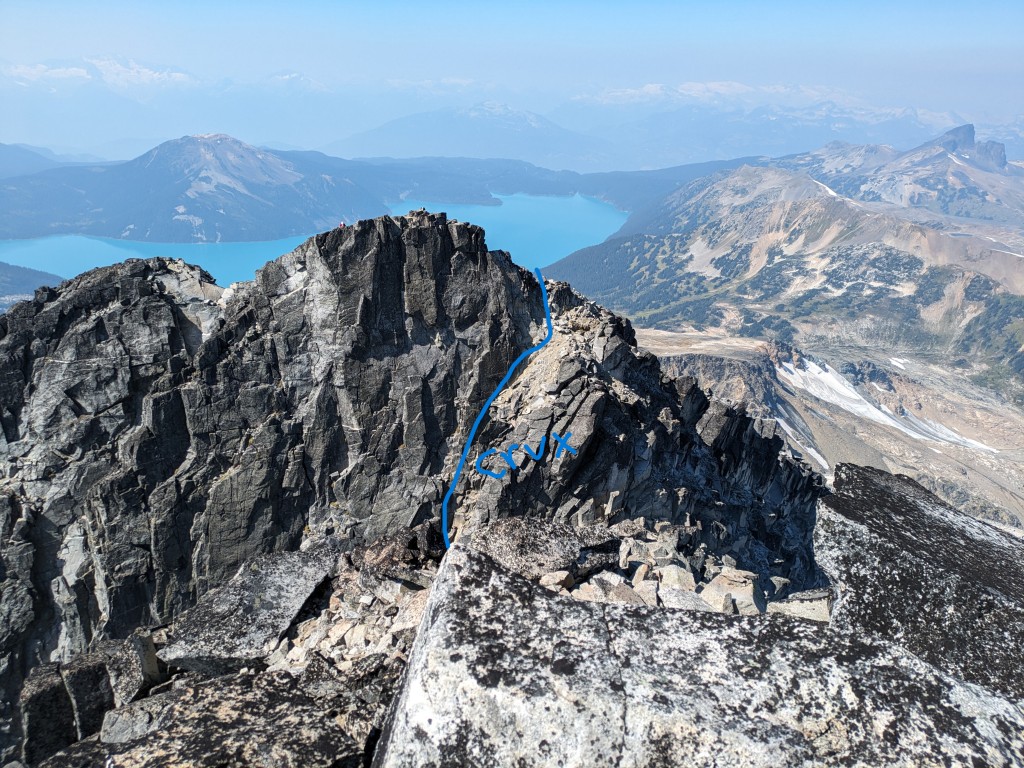
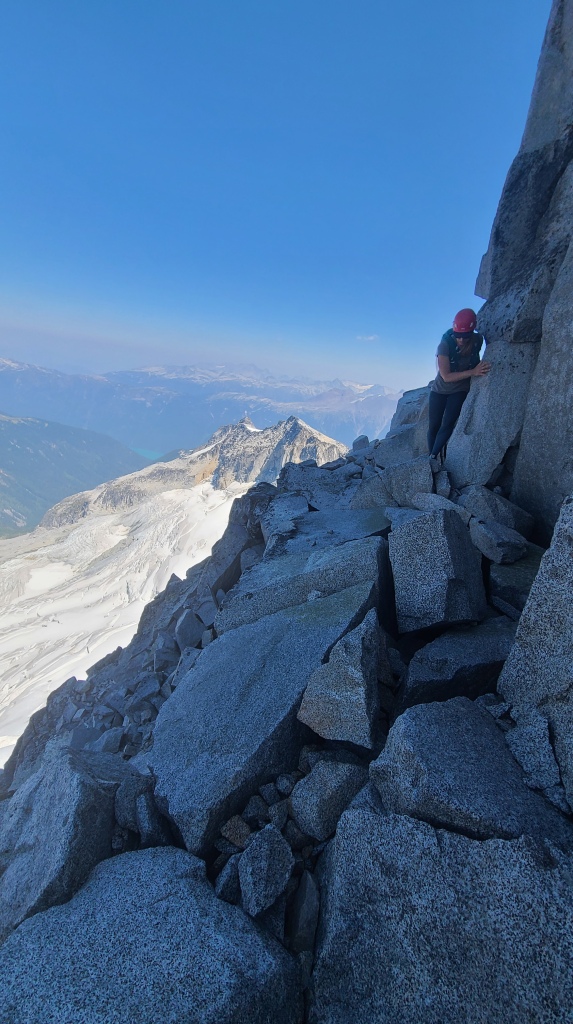
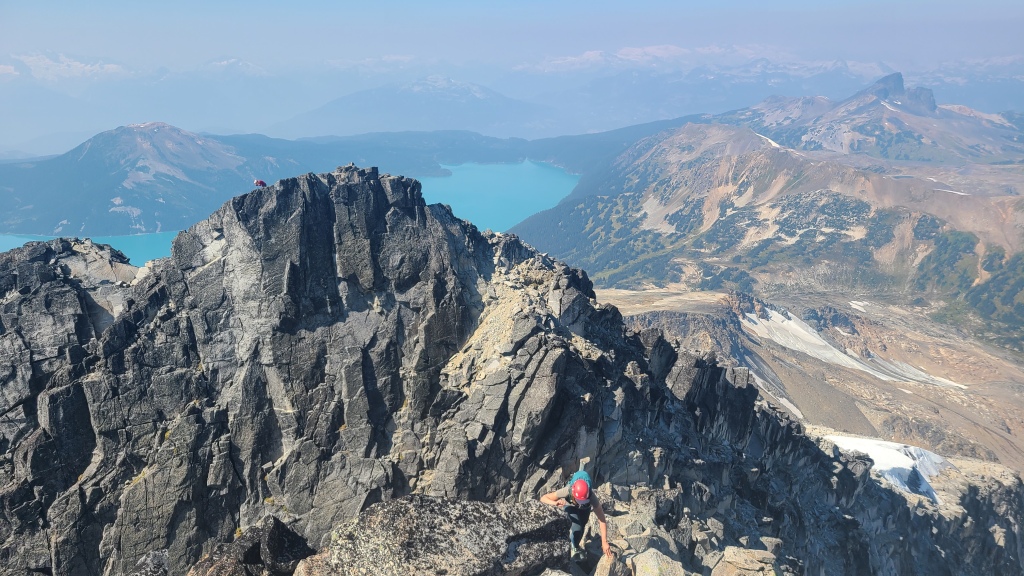
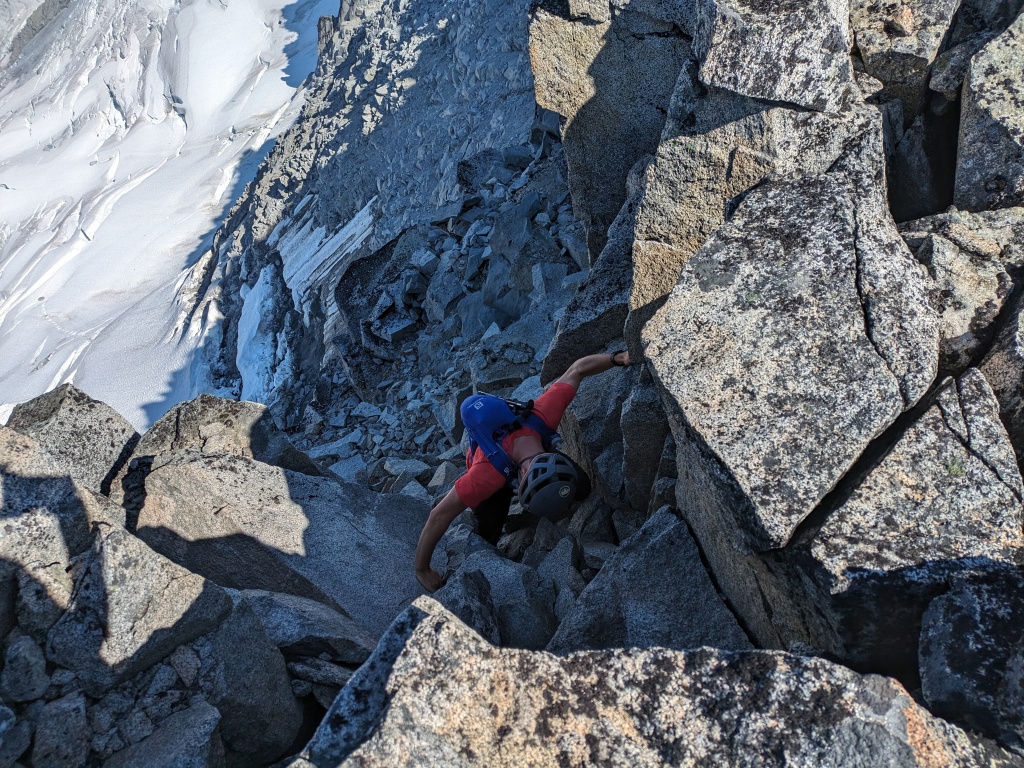
There is nothing technical about the west summit of Castle. After the notches, a long boulder field will take you straight to the summit. It’s a bit of a slog, but the boulders are generally quite stable at least. At the west summit, we took a short break to survey the central summit and give another group some space on the loose rock. While it might look a bit intimidating (scrambles always look steeper from a distance than they actually are), the central summit is a lot of fun and definitely worth the 20-30 extra minutes it will take. To reach it, drop down about 5 meters from the west summit around the north side. From here, you’ll see a diagonal ramp ending in a chimney that will take you down to the col between the west and central summits. This ramp includes some class 3 scrambling. The crux of the whole day, a reachy step with some loose rock, is midway down the ramp/chimney. Face in and downclimb, test all holds (hands and feet) before you commit, be very conscious of dropping rocks as you move, and make sure everyone gives each other space and avoids fall-paths. It goes well enough, and it feels minimally exposed. From here, cross the col, then choose whatever way looks easiest up the central summit. I followed a faint, dusty footpath, and that was fine, but Chris more or less just went straight up, which was also fine. Near the top, we encountered a short, vertical headwall. From here, we traversed climber’s left across a wide ledge, then did a few more scramble moves up the obvious chimney, then we were at the top! All moves were easy and not exposed. From our camp at Gentian Pass to the west summit took 2 hours 15 min, and we were on the central summit in less than 3 hours, including a decent break. To descend, we simply reversed the route, and were back at camp in about 5 hours total. The total day was about 1000 m gain over 7 km.
A lazy afternoon of trying to stay cool followed, including lake dips, electrolytes, and lots of soup. On the morning of the third day, we packed up our camp and headed back up to Gentian Ridge. As we weren’t impressed with our speed on the glacier when we hiked in, we opted to try the alternate route on the way out: the ridge connecting Gentian and Helm peaks. At the edge of the glacier, we stayed low on the north shoulder of the ridge instead of hiking up to the skyline, hoping to cut out that extra elevation gain if possible. We traversed the shoulder very far, through numerous ups and downs, and found all of the terrain quite reasonable. Near the end, once you’ve passed the glacier below, the shoulder peters out a bit – you can climb up to the skyline from here, then follow the ridge crest to a northeast rib leading down from Helm peak, or you can cut down and across the slope and bushwack a little as we did until you connect to that same rib leading down from Helm. Based on the lack of footprints we saw, we suspect few people elect for the bushwack. Regardless, we hit a footpath eventually, and were down on the valley floor in about 2 hours from the top of the ridge. From here, we crossed country until we struck the main hiking trail out of Helm Creek campground, and then it was simply a hot, dusty walk back to the car. Day three ended up being 15 km with about 400 m of gain (250 m from Gentian Pass up to Gentian ridge, then another 150 m of ups and downs on the ridge). Camp to car took about 4.5 hours.
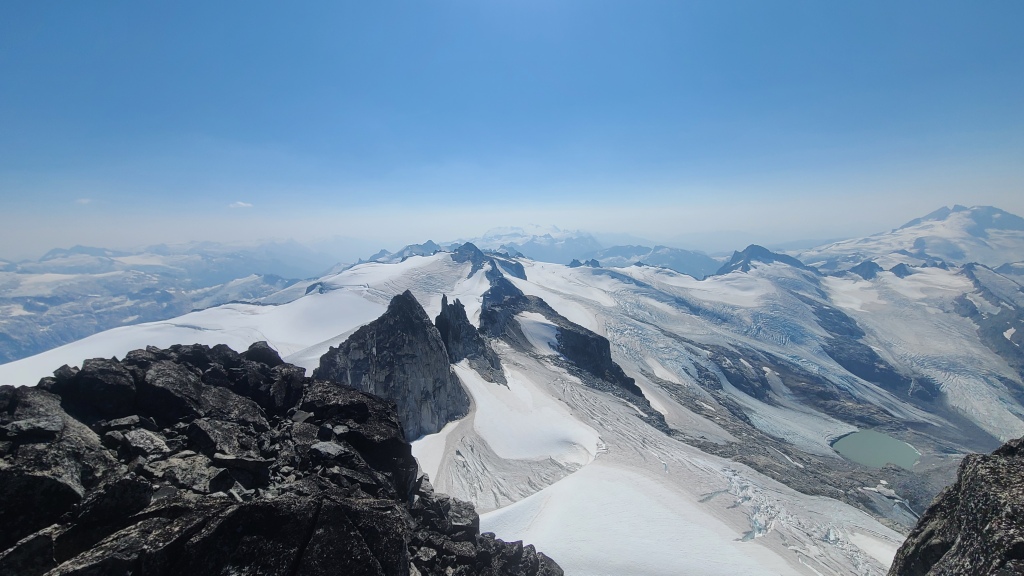
Overall, Castle Towers was a fun hike/scramble on decent quality rock, but I’m very glad we chose to spread it out over three days! The views were incredible, even with a bit of smoke in the air, and days spent in Garibaldi Park are always days well spent.

Looks awesome, out of my league thou. Love the 3 day backcountry., see less people which is nice.
LikeLike
Haha you could do the West Summit at least I think. It’s mostly just a long hike. Thanks for reading! 🙂
LikeLike