
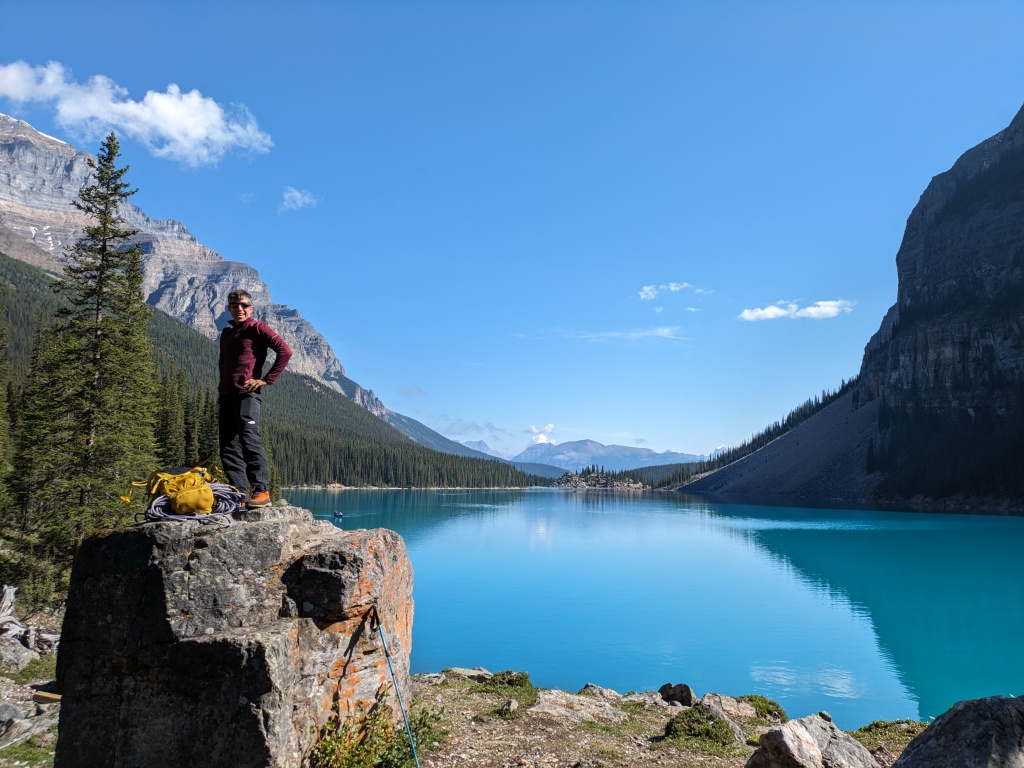
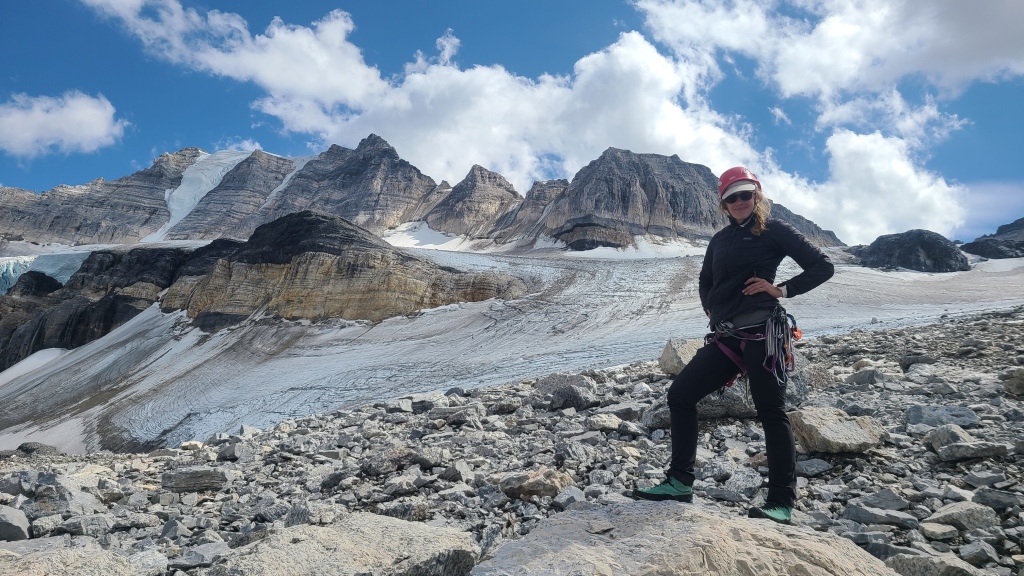
Mountaineering near Moraine Lake in the Canadian Rockies, AB
Just a few kilometers behind one of the most popular destinations in the Canadian Rockies – the brilliant teal waters of Moraine Lake – lies an exciting mountaineering adventure. The glaciated north face of Mt Fay overlooks the lake, with a cozy mountaineering hut nestled near its base: the Neil Colgan Hut, maintained by the Alpine Club of Canada. An approach to the hut is no simple hike either; a full day adventure of route-finding, pitched rock climbing, and glacier travel is required to reach this tiny mountain sanctuary. From Fay, a number of epic climbs awaits. Read on for a glimpse of our three-day trip to Moraine Lake, the Neil Colgan Hut, and Mt Fay.
The Lake Moraine Approach:
To access Lake Moraine and the myriad of climbs around this popular area, you must pre-book a spot on the shuttle departing from the Lake Louise Ski Resort. As of 2023, cars are no longer permitted to drive or park at Lake Moraine due to overcrowding, so the shuttle (or biking) is the only option. However, booking a stay at the Neil Colgan hut is a somewhat different story, as the ACC has an agreement with the park that space must be provided on a shuttle for those who have booked nights at the hut.
How it works: simply book your stay at the Neil Colgan hut with the ACC, then show up at the park and ride at the Lake Louise ski resort on the day of your departure. Speak with the staff at the ticket window and show them your hut reservation, and they are required to allow you to hop on the next shuttle, regardless of whether shuttle tickets are sold out for the day. You will still be required to pay for the shuttle at the ticket booth at a rate of $8 per person roundtrip. (However, the nice man at the ticket booth gave us a free ride for some reason! Win!). Now, you might be wondering: how can you still ride the shuttle if the tickets are sold out? Doesn’t that mean there’s no more space? It does not! The ticket system is a bit confusing, and does not correlate 1:1 with shuttle seats. When you pre-book a shuttle spot, you are able to take any shuttle departing within an hour timespan, which means you’ll hop on one of three different shuttles (as they leave every 20 minutes). Our ‘sold out’ shuttle was only about 1/3 full, and other folks we talked to enroute had a similar story.
At the end of your trip, to catch a return shuttle back to the park and ride, simply queue in the Moraine parking lot where you were dropped off by the banner that says ‘park and ride’ (and be careful not to wait in the ‘Lake Louise’ line, as some of the shuttles take people from Moraine to Louise). A shuttle should arrive to pick you up within 20 minutes.
The Perren route:
There are two common approach routes for the Neil Colgan hut from Moraine Lake: the Perren Route and the Schiesser Ledges. The Perren Route seems to be the most popular, as it’s a bit shorter, and contains some fun technical sections.
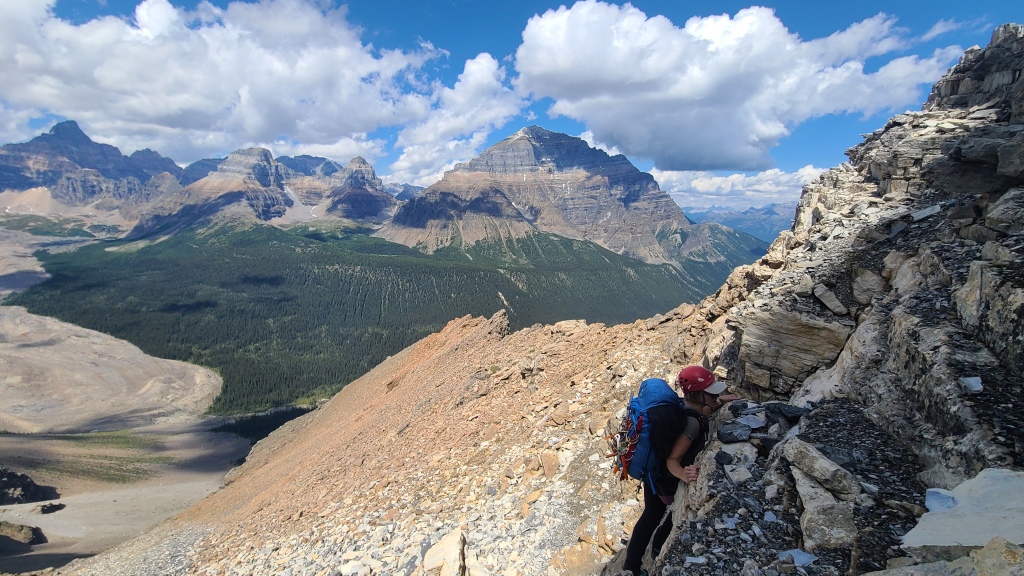
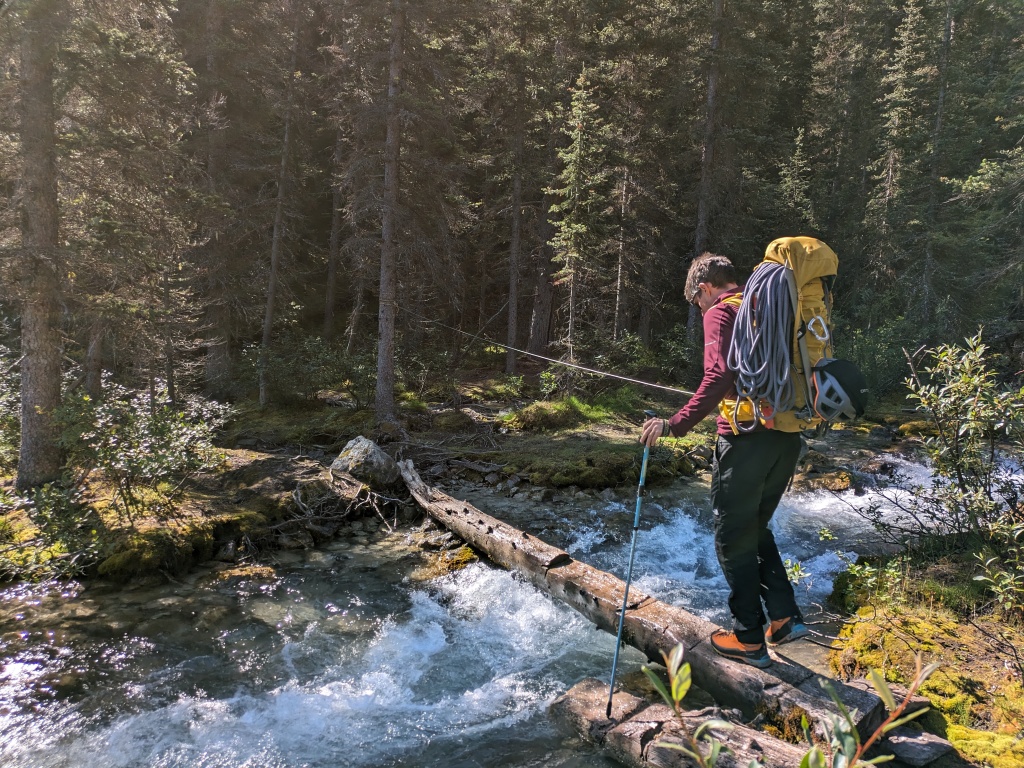
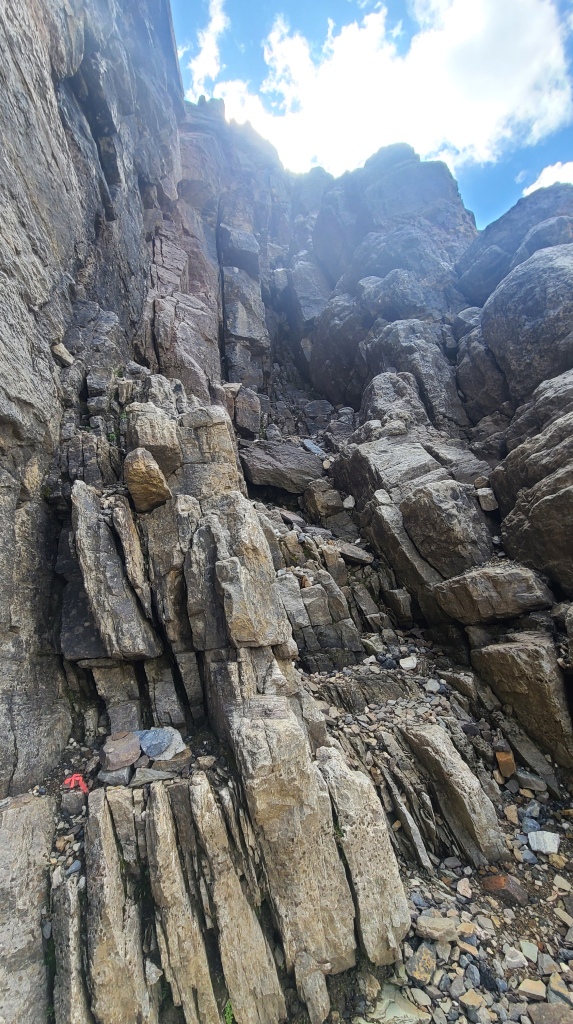
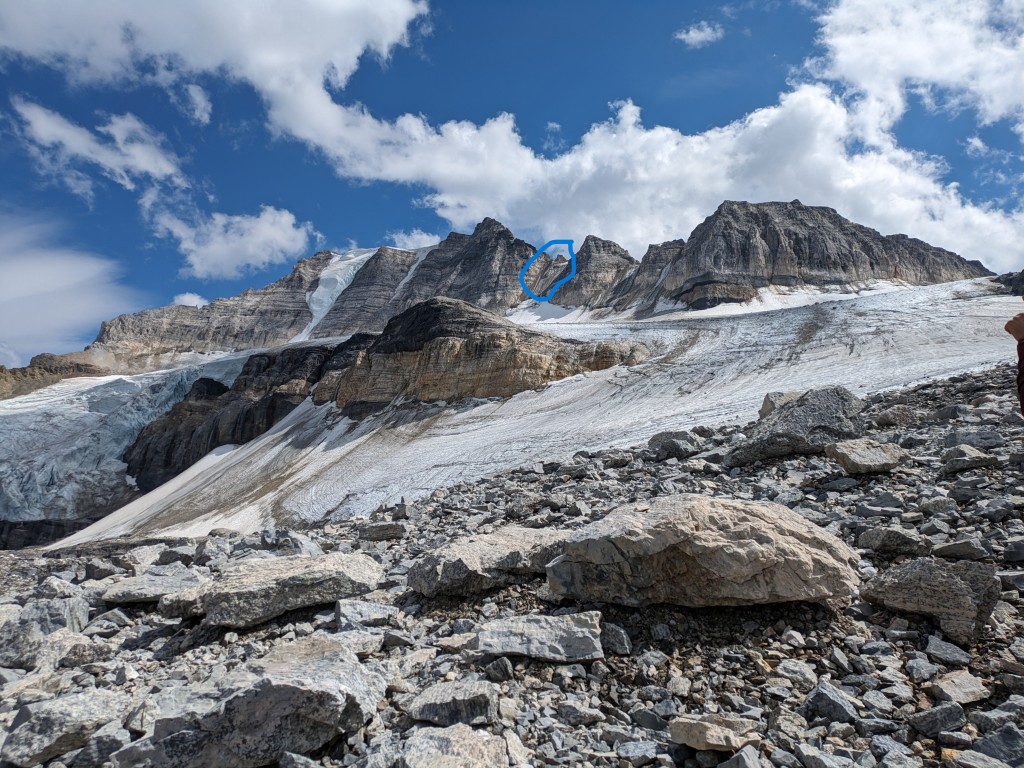
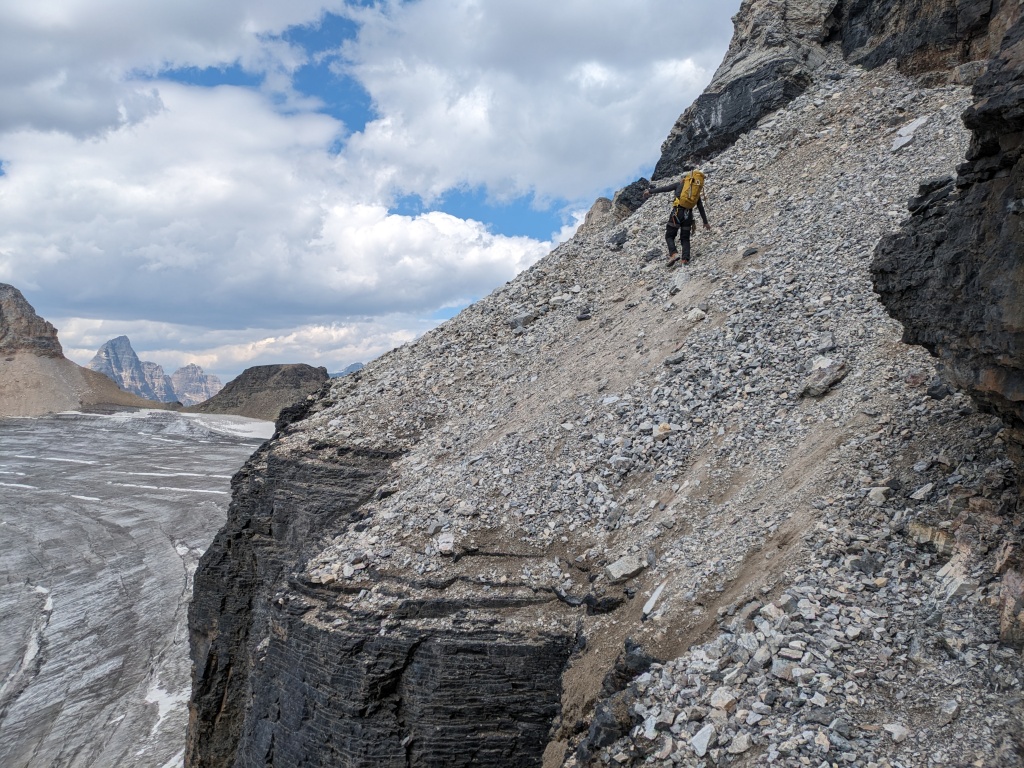
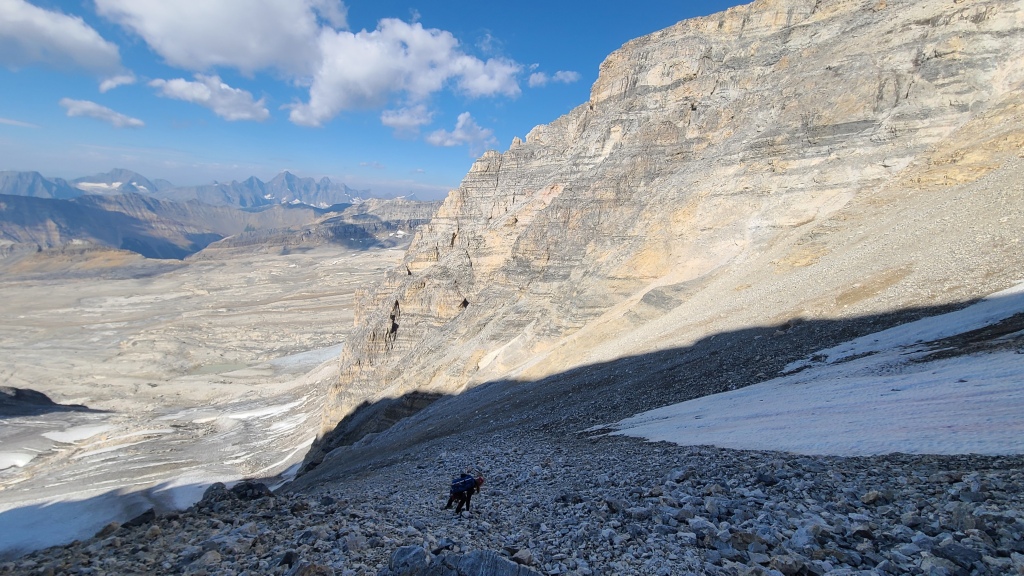
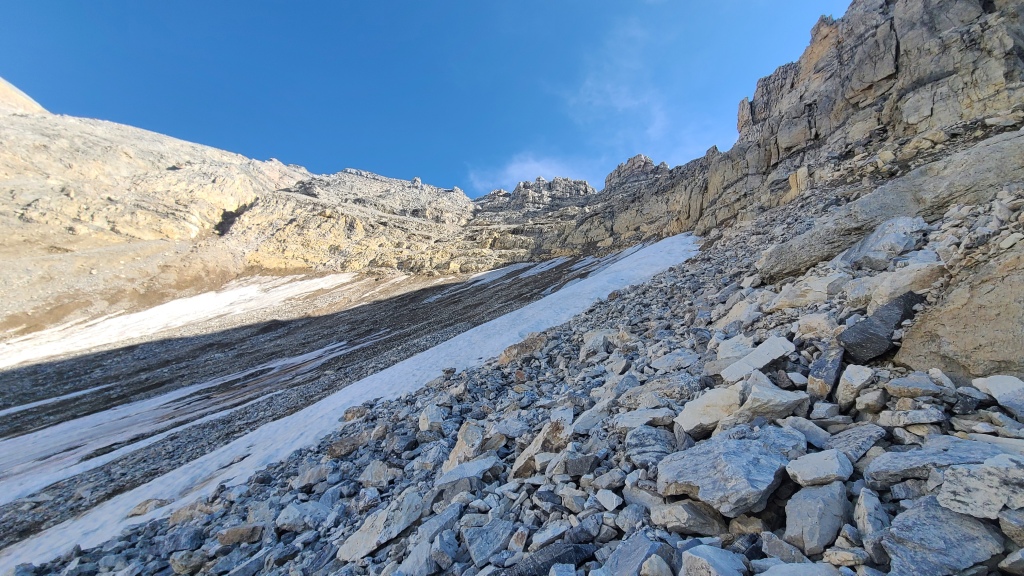
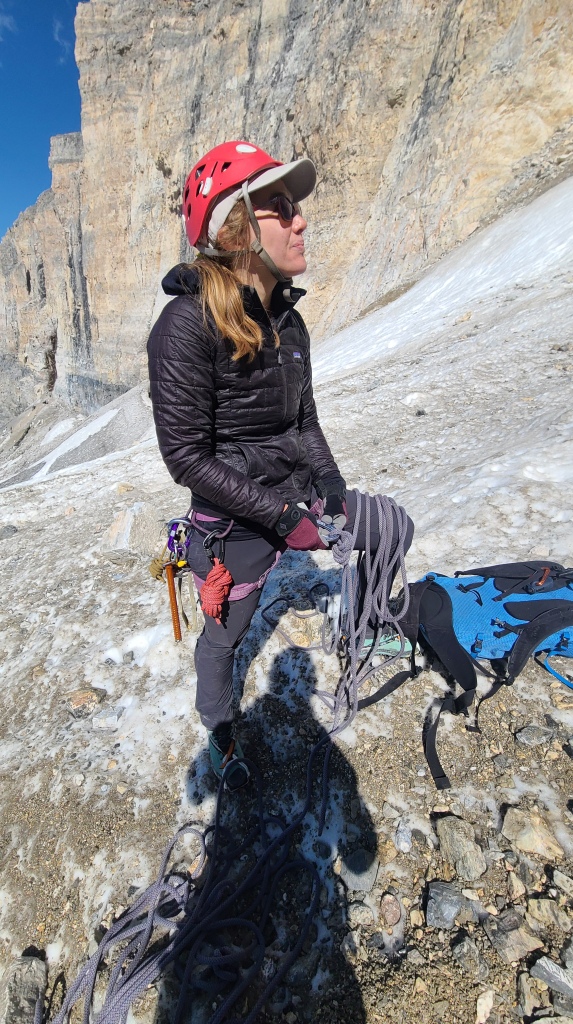
For the Perren Route, walk the lakeside trail (roughly 2.7 km) around to the far end of Moraine Lake. From here, carefully cross a series of wet logs across the river (there’s a loose handline set up, but it’s not great! Some people choose to wear crampons here for extra grip, although we did not, and we thought it was fine). If the river is low enough, you could also elect to remove your boots and wade across. From here, follow a faint footpath around the edge of the lake – you’ll come to a really nice beach and viewpoint with a huge boulder. The footpath leads from here through the trees for 10 or 15 minutes before opening up into a boulder field dotted with cairns. Following the cairns will take you up a long scree field where a path will emerge again on the left under the cliff. Once on top of the scree field, the path will take you left into a series of ledges. There are some small scramble sections here, but nothing too hard (one or two bolts or pitons mark these sections, but I don’t think many people would get the rope out for this). Some fixed handlines are even present at one point.
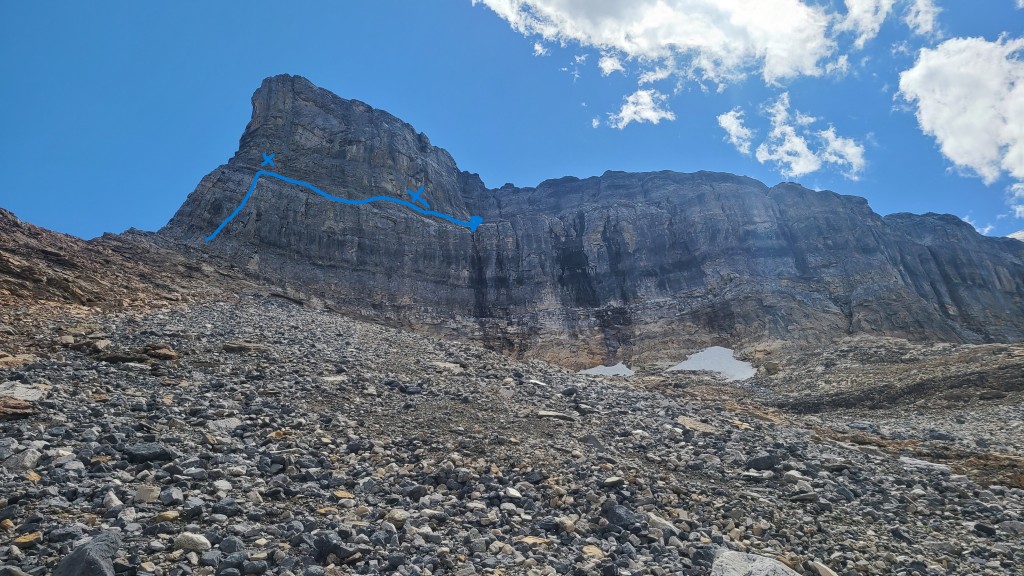
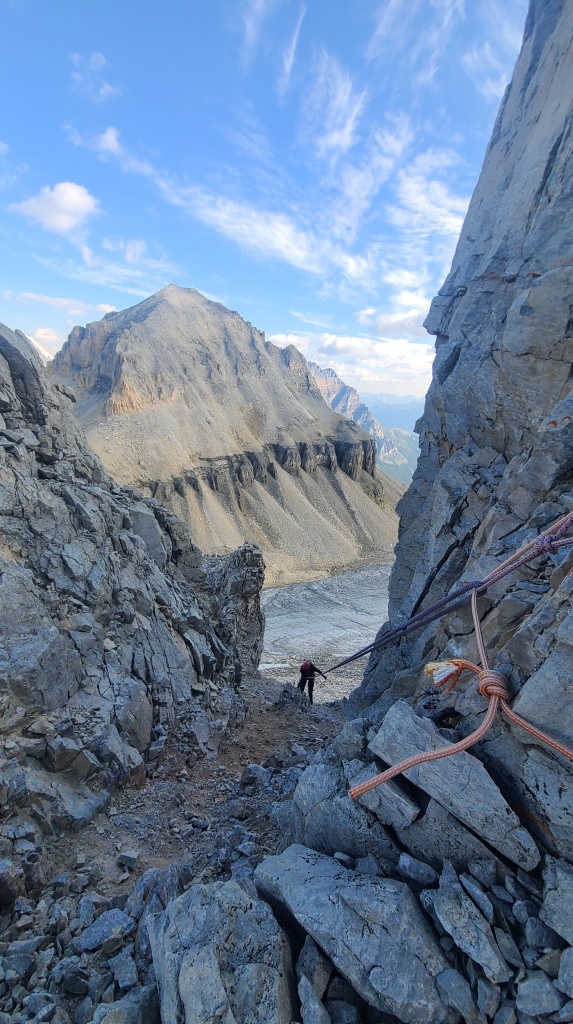
The first crux is encountered after the ledges, and is somewhat tricky with a heavy pack. A slightly overhanging chimney lies in the path – the difficulties can be bypassed with a careful traverse climber’s right around a boulder, then heading straight up. The path continues climber’s left from the top. Keep your eyes peeled as you pass this section for the rappel stations: on the way down, you’ll bypass this section with two straight rappels down the cliff face. A steady climb marked with the odd piece of flagging tape will lead to another steep scree slope and the technical section of the route.
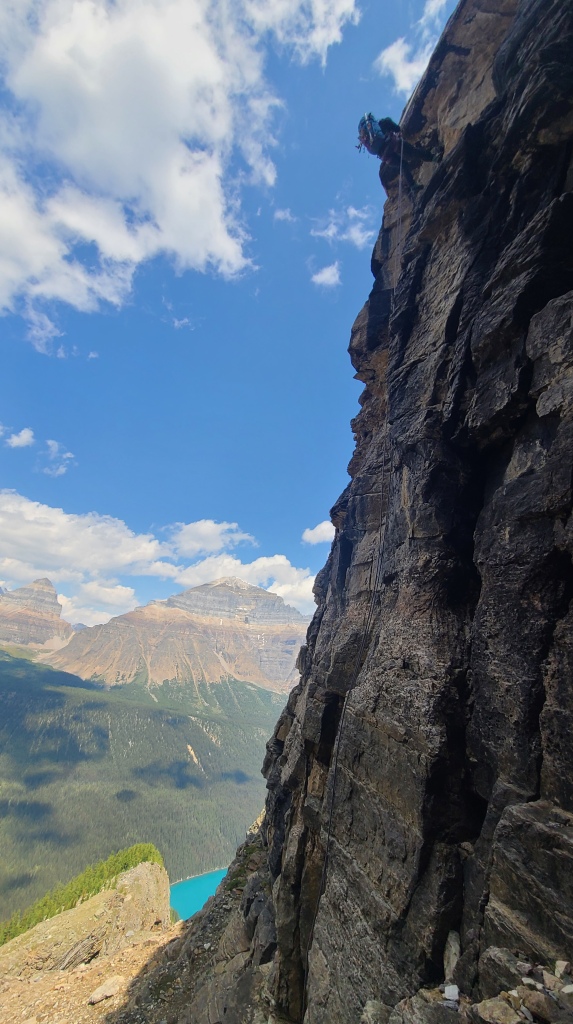
The technical climbing begins at the top of the scree slope with a large headwall above you. You’ll climb a 5.7 crux just right of the ridge visible on the lefthand skyline, then traverse a white band midway up the wall to the obvious ledge. From the ledge, you’ll follow another faint path until you reach a slabby chimney that takes you straight up the wall to the base of the glacier. Here’s some additional details on the pitches:
- The 5.7 climb: As you approach the wall, you’ll see the pitch marked with a long chain to assist on the crux. Scramble to the base and rope up from here. In rock shoes, this would be a tricky Rockies 5.7, but in mountaineering boots with a heavy pack, I found it downright tough! The crux is midway up the pitch, in between the wall and a small, slick pillar. As there are no good feet here for thick boots, it’s best to just haul yourself up the chain, placing draws anywhere on the chain for protection as needed. The pitch ends in a bolted station. With some upper body strength, the pitch is fine, but some climbers also utilize the following strategies:
– Climb first, then haul bags up after from the anchor. This is time-consuming however.
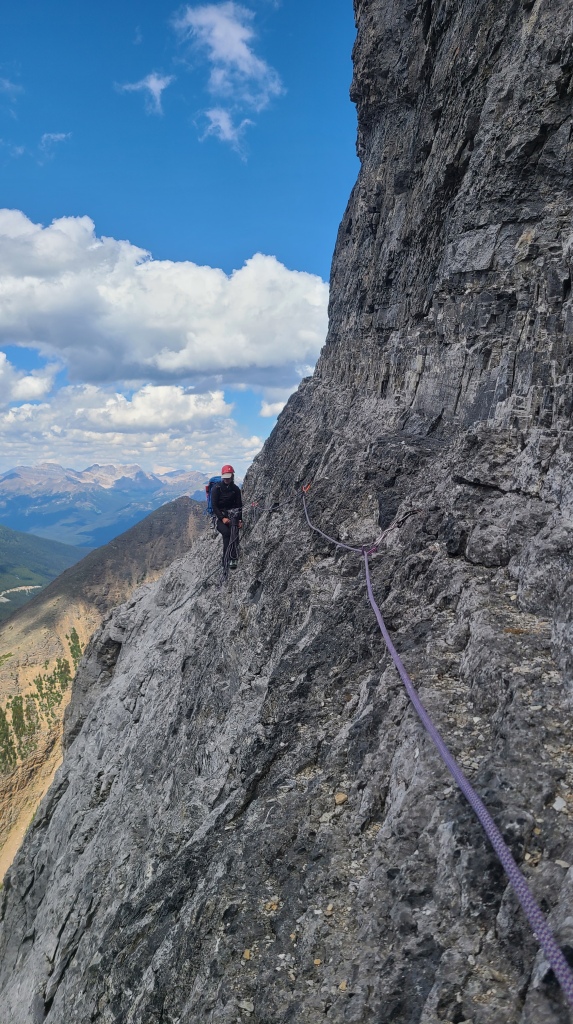
– The first person can lead without their pack, create an anchor, then lower and climb up again on top rope with their pack. - The traverse: from the anchor at the top of the 5.7 pitch, you’ll traverse climber’s right past about 5 bolts to another bolted anchor. People generally still keep the rope on here, but the traverse is actually pretty easy, especially compared to the burly 5.7 pitch. From the anchor at the end of the traverse, walk along the huge ledge to the final climb. As you leave the anchor, look for a cairn near the edge of the cliff on your right, as the rappel station for the descent is here.
- The slab chimney: you’ll see this pitch on your left as you cross the ledge towards the toe of the glacier visible on the cliff above you. A slab crack/chimney leads straight up the cliff. It’s a little tricky if you’re not comfortable with your boots on slab; you can optionally rope for this pitch, but the protection is thin, only a single bolt midway. A bolted station lies at the top around a bend on climber’s left (used for the rappel descent also).
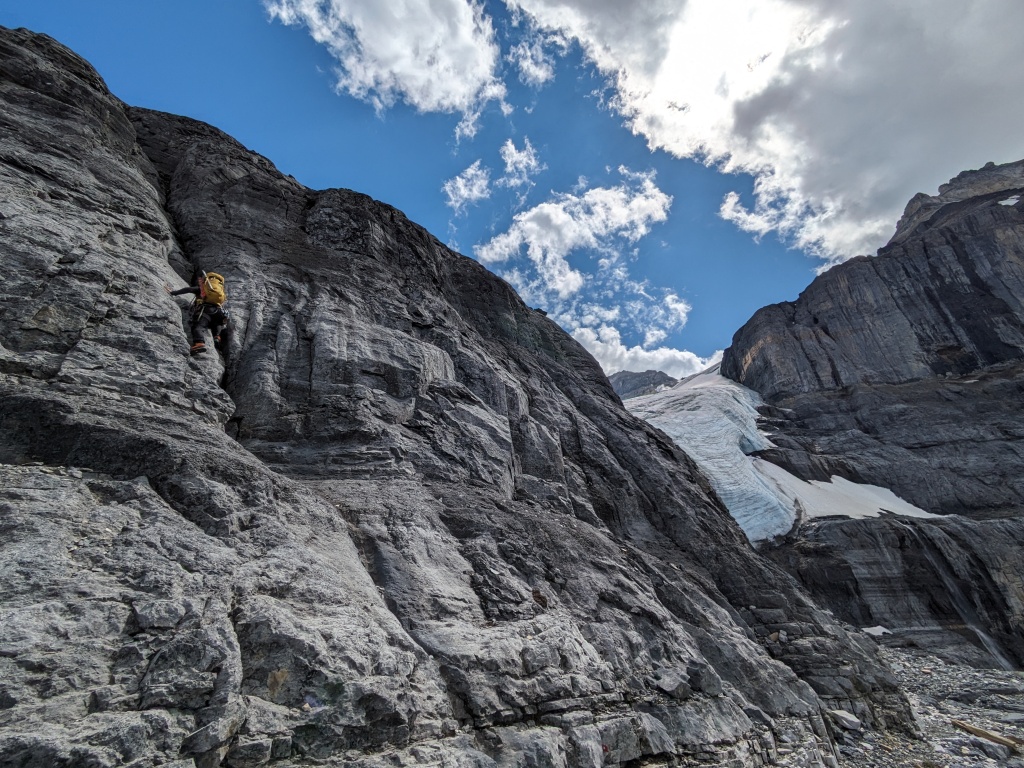
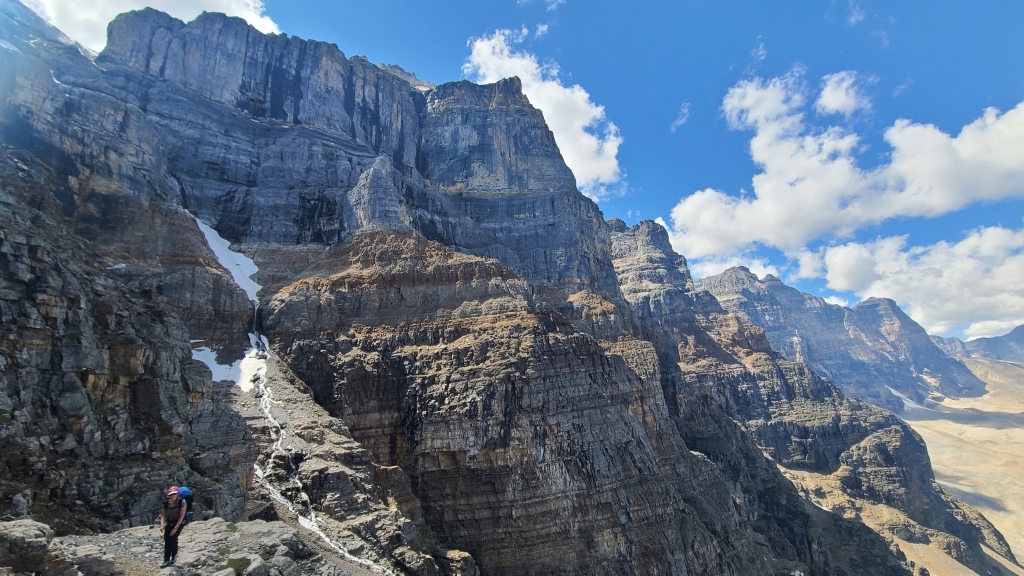
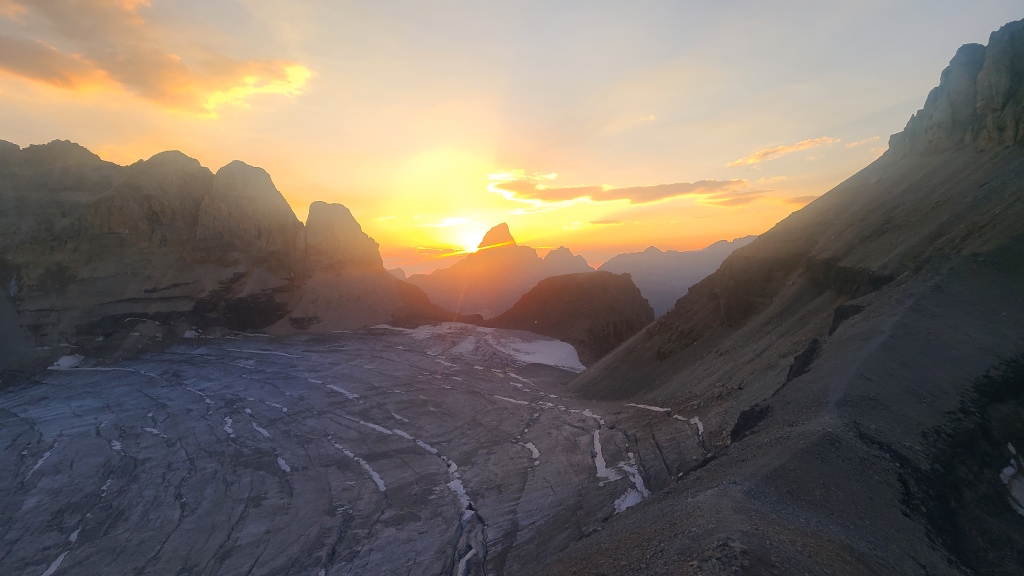
From the top of the slab chimney, follow the faint footpath through more scree to the edge of the glacier, and rope up for glacier travel. Follow the easiest path through the crevasses up to the col. This will vary of course, but generally climber’s left is mellower terrain favouring smaller crevasses, whereas the convex roll to the right is steep with very large crevasses. At the crest of the ridge at the top of the col, you’ll see the hut in front of you. Cross the slope (again, be mindful of crevasses here – I punched through to my waist here when we left the hut at the end of our trip), and ascend some final loose rocks to its door.
The average time to access the hut via the Perren Route is 5-7 hours according to the ACC. We were up in about 6.5 hours at a leisurely pace.
The Neil Colgan Hut:
The Neil Colgan Hut can be reserved online or by phone with the ACC. It sleeps about 16 to 18 people, and costs $50/night per person as of 2023. The hut is one large room with bunks on one side and a kitchen/seating area on the other. It’s well-insulated, but there is no heat. With just a handful of other people in the hut and the propane stoves going for dinner, it was quite warm inside (20+ degrees celsius), and very cozy overnight. Even when we had the whole place to ourselves, we were quite comfortable weathering a wind and hail storm. The hut features a couple propane stoves and lights (with a large tank of propane outside supplied by the ACC), as well thick mattress pads in the bunks. There are large pails for gathering snow for drinking water (late-season, we were able to collect running water from the glacier below the hut). An outhouse is outside just around the corner of the building.
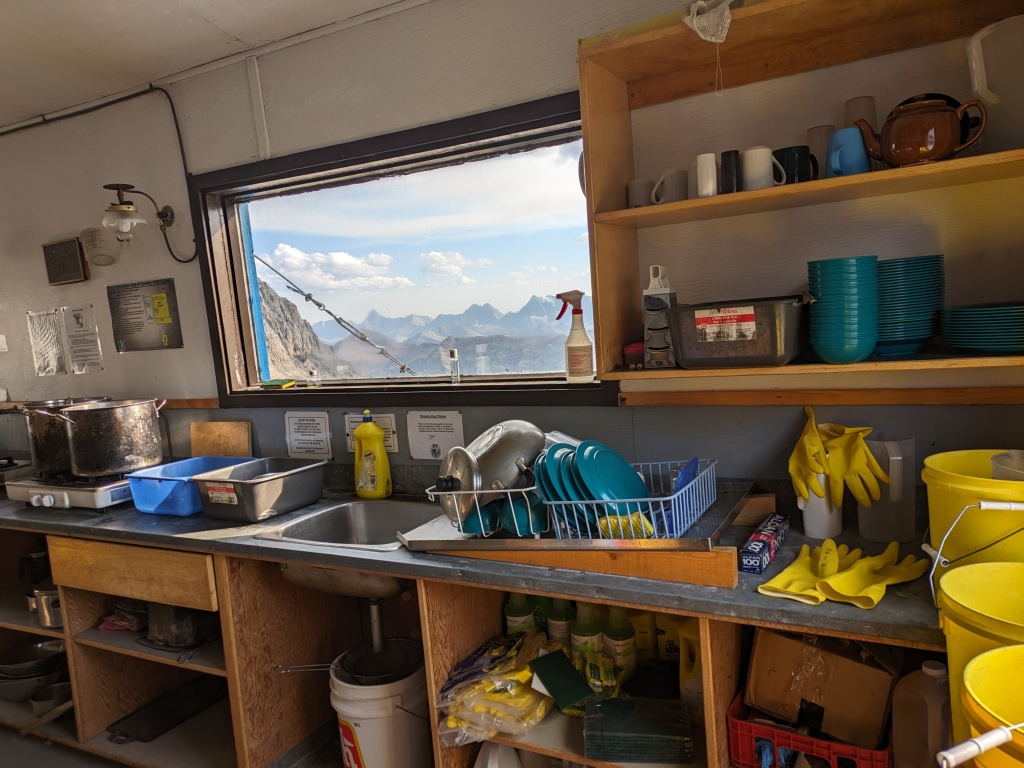
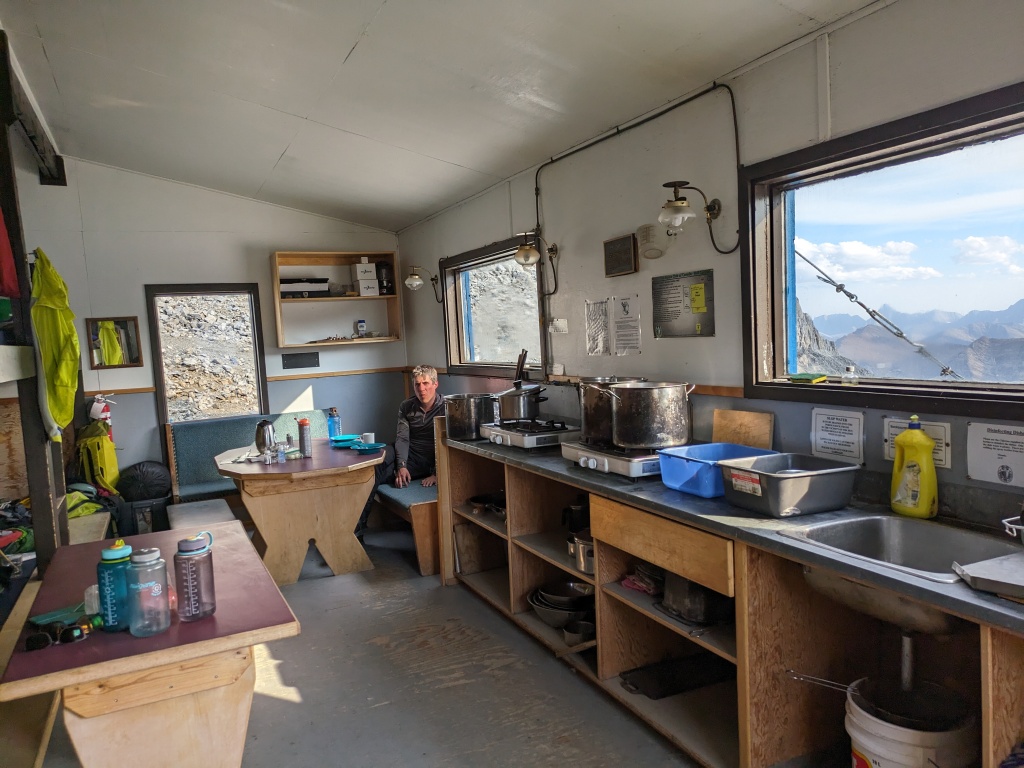
The kitchen is well-stocked with cooking and cleaning basics: large tubs for dishwashing, dish soap, gloves, scrub pads, sponges, chlorine for sterilizing dishes, pots, pans, one cast iron pan, cheese graters, cutting boards, knives, cutlery, mixing/serving spoons, plates, bowls, mugs, cups, teapots, and one ACC-branded French press for coffee. There is definitely no need to bring any equipment for cooking or eating. All you need is your sleeping bags (mats are provided), food, and technical gear!
The Southwest Slopes of Fay:
We arrived at the Neil Colgan hut, as most do, eager to climb the classic west ridge of Mt Fay. However, we soon learned from Rockies locals that the snowpack this year is abysmal. While Fay, a steep snow/ice climb up a couloir, can be done into August some years, we found the route out-of-condition. The usually snowy couloir was bare ice covered in rock and dirt; you’d want to pitch it as an ice-route to climb it, and even then, you’d have to clean the ice first to protect your screws, and the rock-fall hazard would still be high. The crux of the route, the bergschrund at the bottom, still looked like it had a decent snow-bridge on one side, although I don’t know that I’d want to test it.
Disappointed that we’d have to put off this classic route until another year, we combed the guidebook for an alternate adventure. Still wanting to attempt Fay, we settled on an obscure but easy-looking route from the guidebook. We didn’t have much beta except a small paragraph from the book, a photo of the ascent glacier our companions in the hut took from the summit of the nearby Mt Little, and no route topo or map. Setting out early in the morning to allow enough time to make it back to the hut before the forecasted afternoon storm rolled in, we descended terrible scree down to the south side of Mt Little, crossed a small, flat glacier and lots of boulders and rockfields, and headed up the far glacier to the ‘gentle’ southwest slopes of Fay. The rock was absolutely atrocious – just loose and unstable piles left behind as the glacier has receded over the years.
The route to the summit from the southwest slopes is up one of two gullies on climber’s left, but after assessing these near their base, we decided against continuing further. Loose rock and slick glacial ice had quickly taken the fun out of the adventure, and the rockfall hazard in the rapidly warming day made it downright dangerous. We turned back about 200m below the Fay summit, and instead took a roundabout way south of the toe of the glacier to check out a glacial lake and waterfall, and get our boots stuck in the quicksand mud of the river crossings.
Overall, I wouldn’t recommend an ascent of Fay via the southwest slopes route late-season. This route must have been fun and easy during the first ascent in 1904 when the glacier was thick and rock-free and the gullies full of snow, but now it just plain sucks, and we understood quickly why no one seems to go that way! However, we were glad we checked it out, and enjoyed exploring the south aspect, the view of Quadra, the glacial lake.

The Zero-Star Climb:
On our final morning, we went for a quick jaunt up Mt Little, a class 4th scramble on the peak directly behind the Neil Colgan hut. This was perhaps the worst scramble I’ve ever done! Its prominent feature was insanely loose terrain, with rocks constantly tumbling off the ridge onto the glacier below, and lots of scree-walking with only a few short sections of scrambling on the loosest shale I’ve ever encountered. If you like everything moving under you as you climb, this one is for you. While only a scramble, a rope is really nice for the handful of rappels you can do to save yourself death-scree descents. Mt Little was valuable, if not for the climbing, then for the broadened perspective we now have of Rockies climbers’ tolerance for terrible rock: we had a good laugh over how all the Calgary climbers we met really enjoyed Mt Little!

The Perren Descent:
After spending two nights at the Neil Colgan hut, enjoying good food, cozy naps, and beautiful glacier views, we packed up after Mt Little on the third morning to head out. To descend via the Perren Route, generally retrace your steps down the mountain, but with a few rappels in the trickier sections. All rappels can be completed with a single 60 meter rope (ie: max 30 meters each).
Rappels:
- Slab chimney: Use the obvious rap station at the top to descend to the big ledge
- Traverse/5.7 headwall: From the final anchor on the traverse, look across the ledge for a cairn at the edge of the cliff. You’ll rap over the cliff down a dripping wall onto a thin-ish ledge about 5-10 meters above the base of the scree. Traverse skier’s right back to the base of the 5.7 pitch to downclimb back to the obvious footpath.
- Chimney first pitch: Rap to big ledge and you’ll see an obvious bolted station for a second rappel pitch
- Chimney second pitch: Rap to bottom of crux chimney. This one is a lot of fun, as it becomes an open-air rap near the bottom. Tighten those abs to stay upright with the weight of your bag, or hang your bag from your harness on your way down.
The total descent time was about 4 hours, including a lunch stop.
The Neil Colgan may well be my favourite mountaineering destination in the Canadian Rockies so far. An engaging approach makes even lazy days at the hut feel like an accomplishment!

One thought on “Mt Fay and the Neil Colgan Hut”