
Hiking the three-day Quilotoa Loop in Ecuador
If you’re anything like me, perhaps you hit the cervezas frias a little too hard when you travel. Fortunately, a little time exercising in the mountains will get even the most indulgent vacations back on track. After nearly three weeks in Ecuador (read: three weeks of broken fitness routine, coupled with stuffing myself with chocolate, fried fish, and many a beer), I was ready for some serious sweating. And what better way to get my fitness back on track than with Ecuador’s most beautiful through-hike?
What is it?
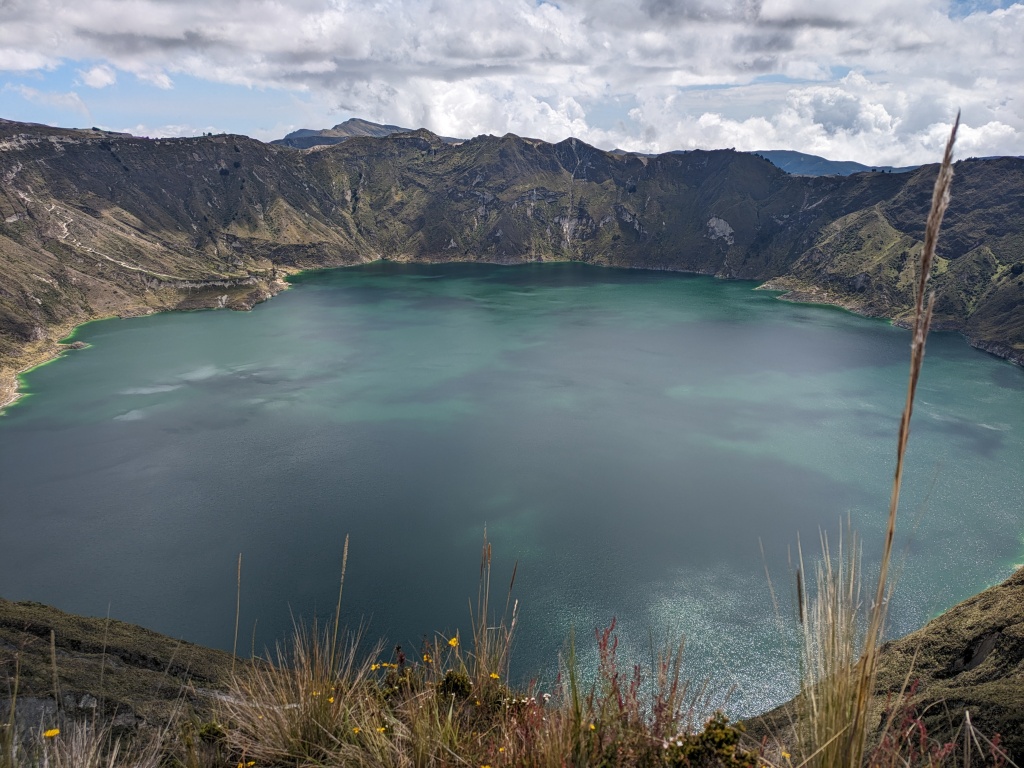
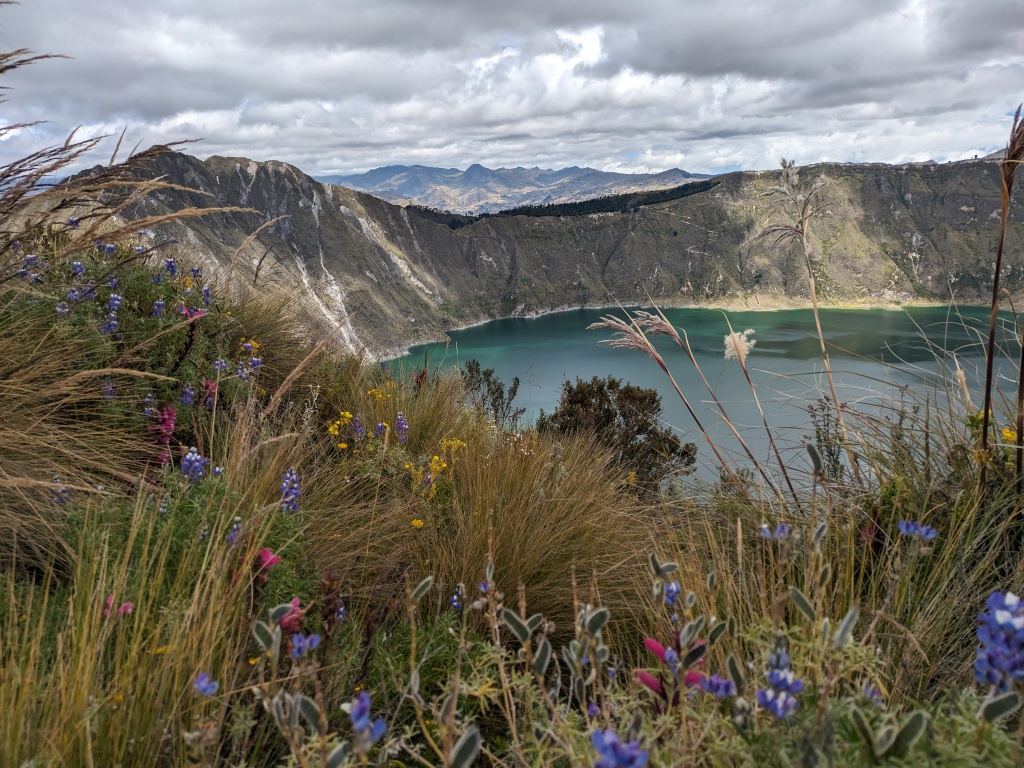
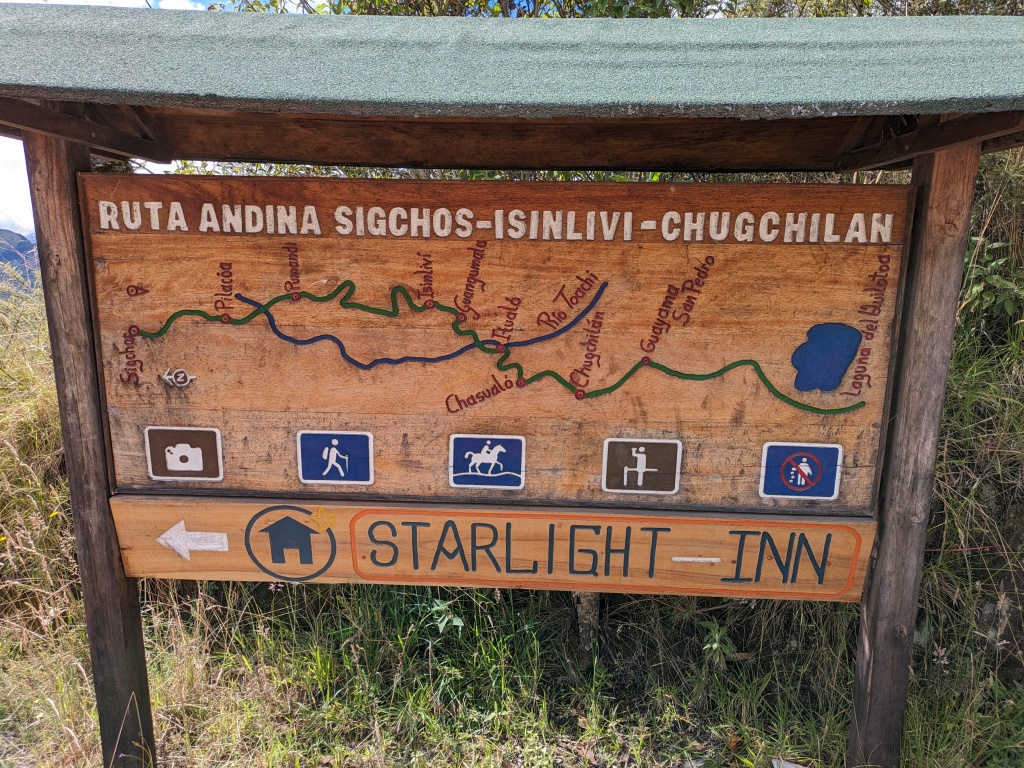
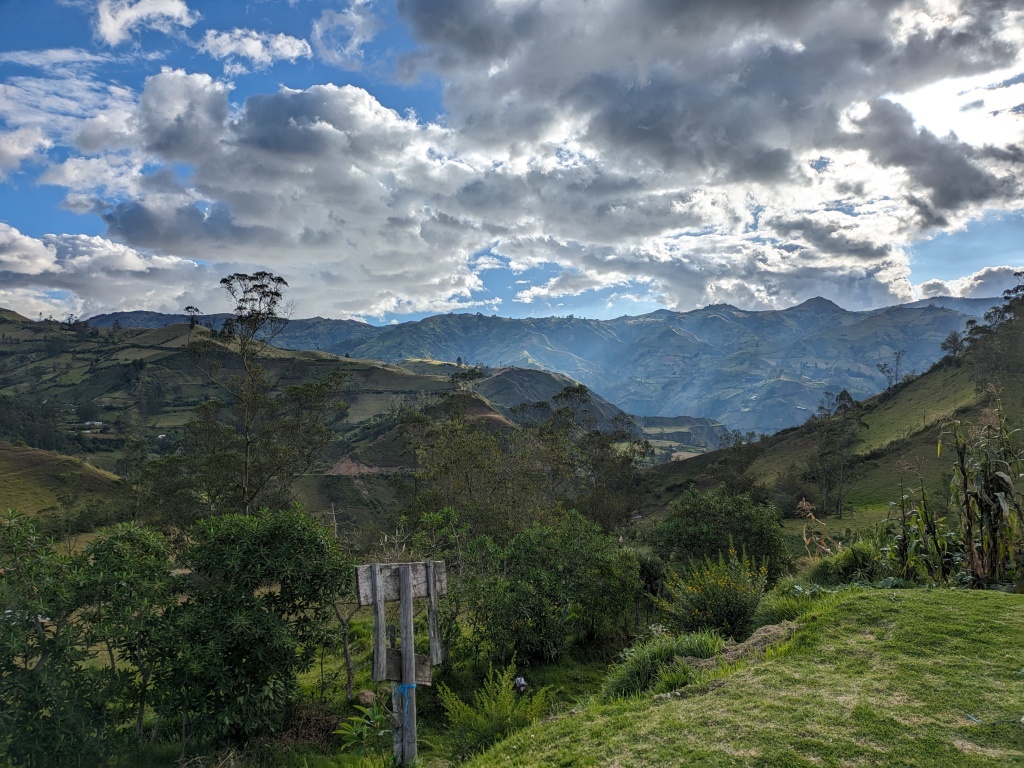
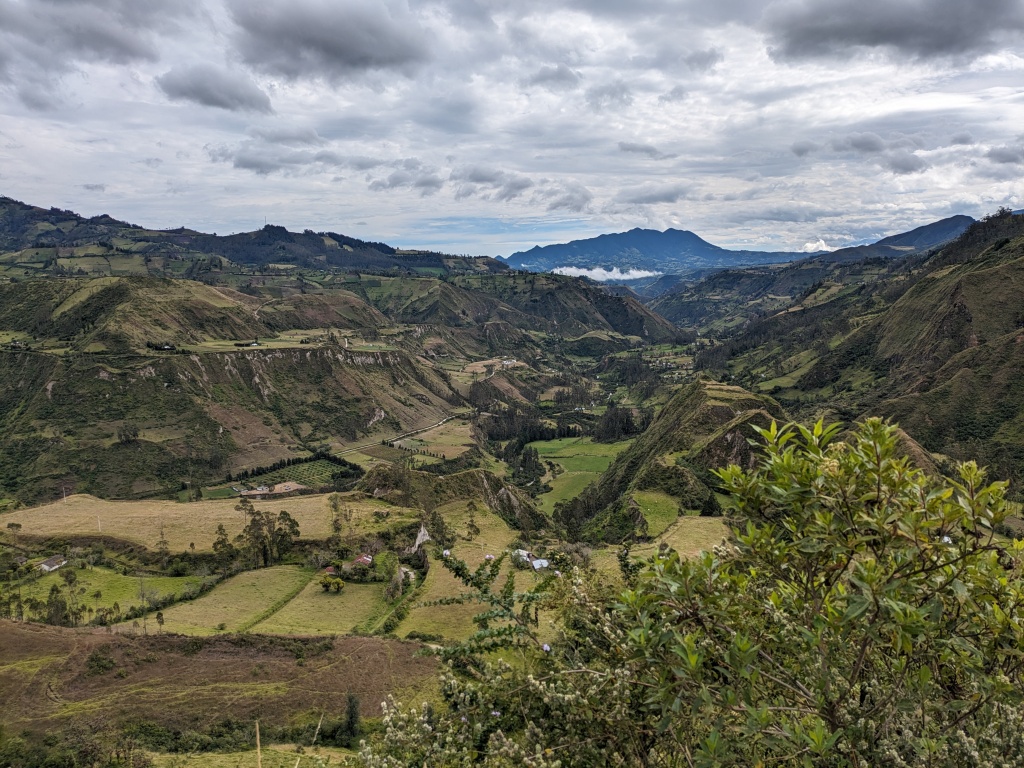
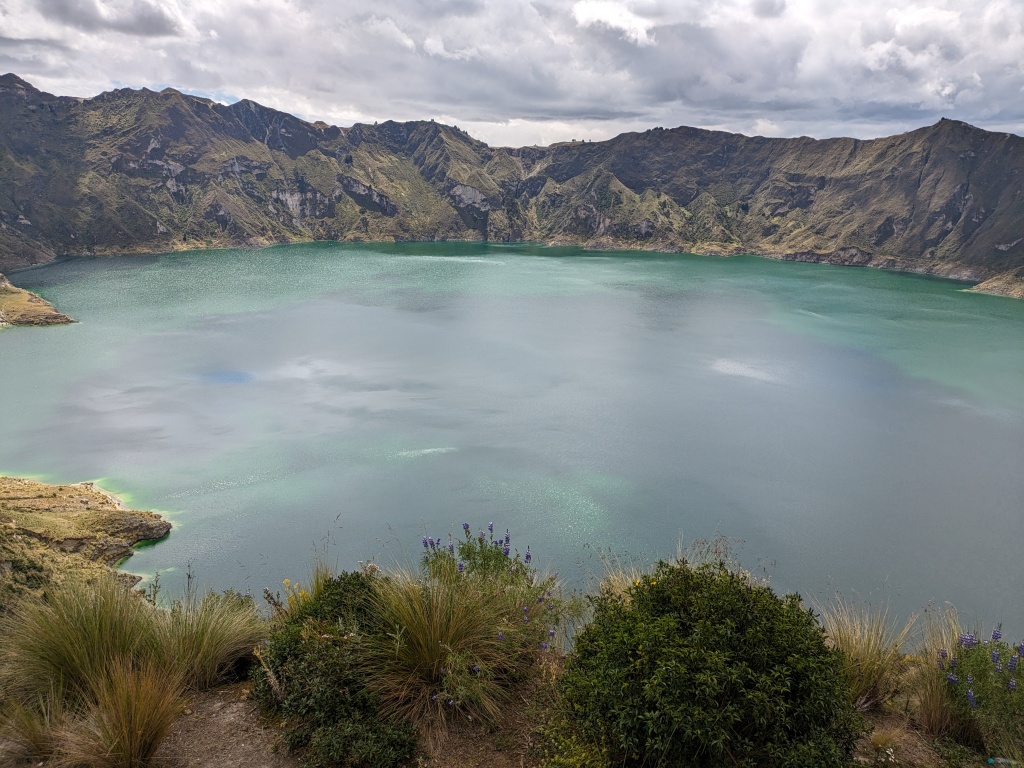
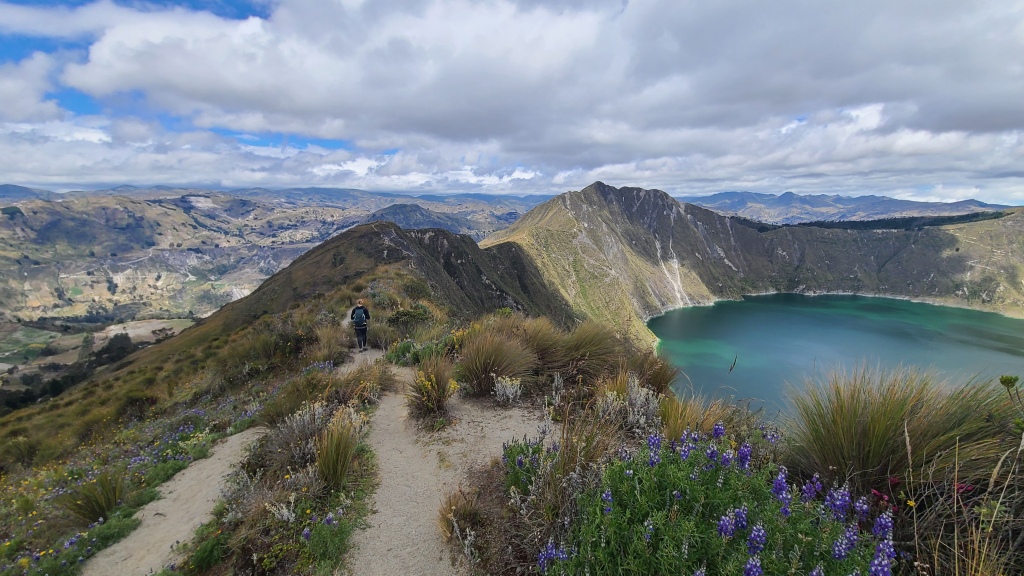
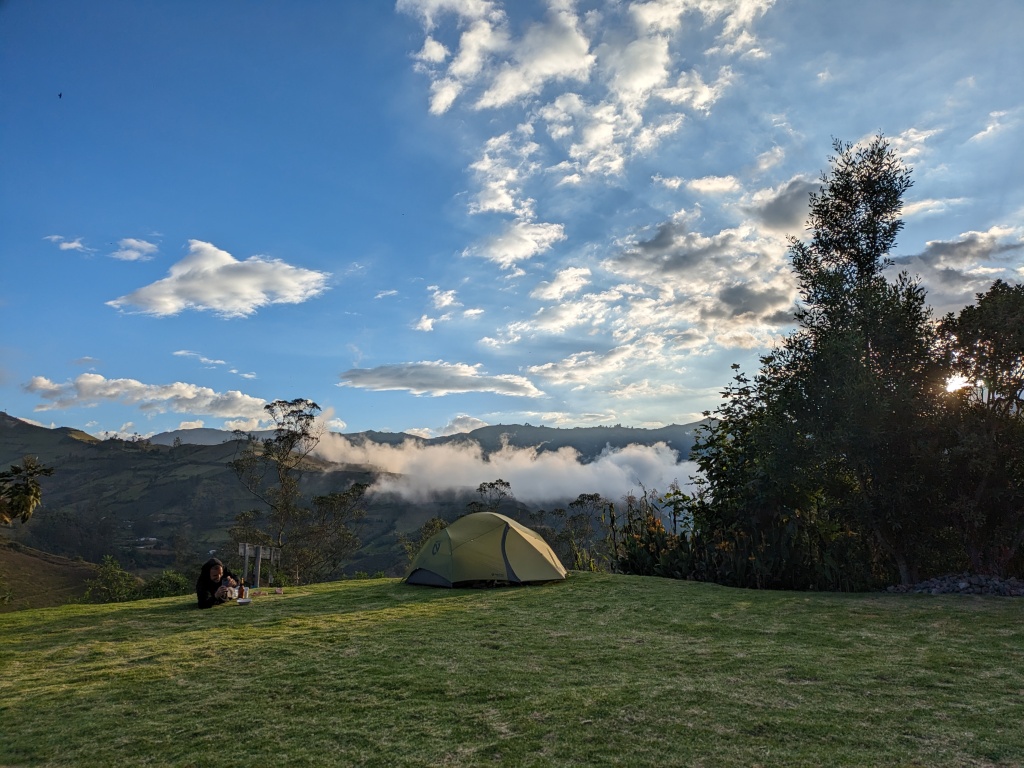
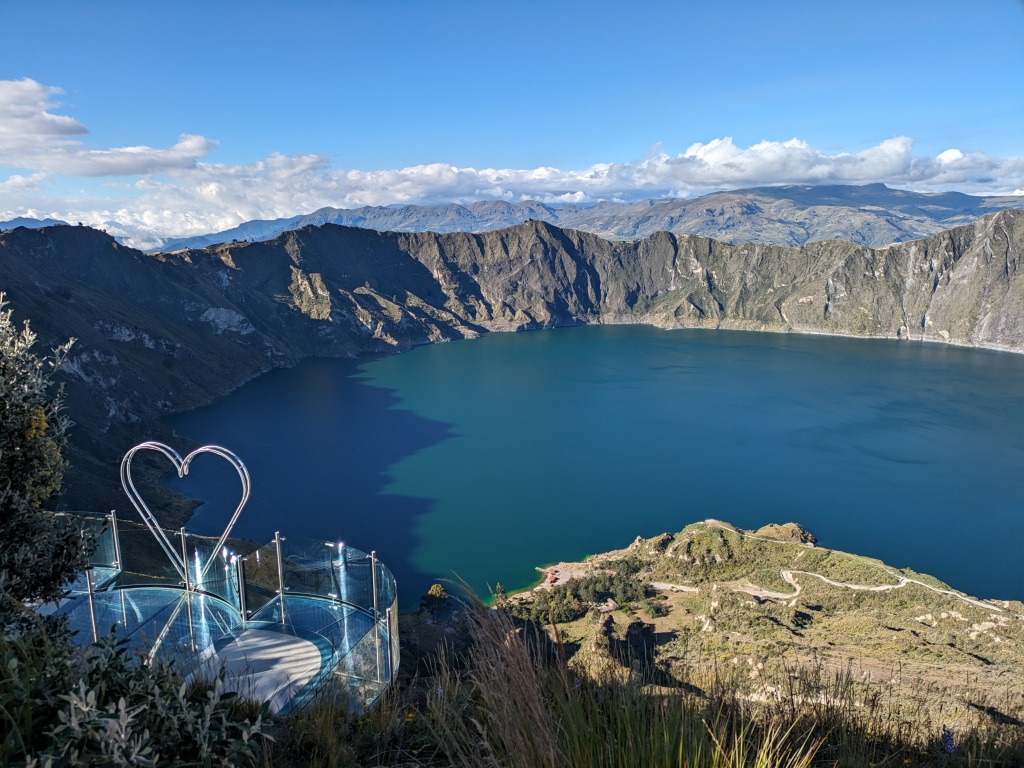
The Quilotoa Loop is a three-day hike through quaint small towns in the Ecuadorian highlands of the Andes Mountain range. The towns at the start (Sigchos) and end (Quilotoa) of the hiking are generally connected via a bus loop from Latacunga, the provincial capital city. While some choose to pack a tent and camp, there is a great network of hostels to choose from every night along the way, meaning you can ditch the camping gear and pack a very light bag. But be warned: while you can travel light, this hike is seriously high. The day-to-day hiking stats might not impress you, but I promise you that you will be gasping for breath on every single hill. The finale of the most common route, hiking from Sigchos to Quilotoa, will deposit you at a stunningly blue-green volcanic crater lake, plus the high-altitude town of Quilotoa nestled around 3900 meters on its flank. Even on a sunny and supposedly warm day, Quilotoa’s biting winds and chilly air will remind you of a brisk December morning, and evenings are downright cold! At an altitude nearly 600 meters higher than Mount Baker (for reference for Pacific Northwesters), you might even find it hard to breathe if you stay the night.
A Possible Itinerary
The most common day-to-day breakdown of the Quilotoa Loop looks something like this:
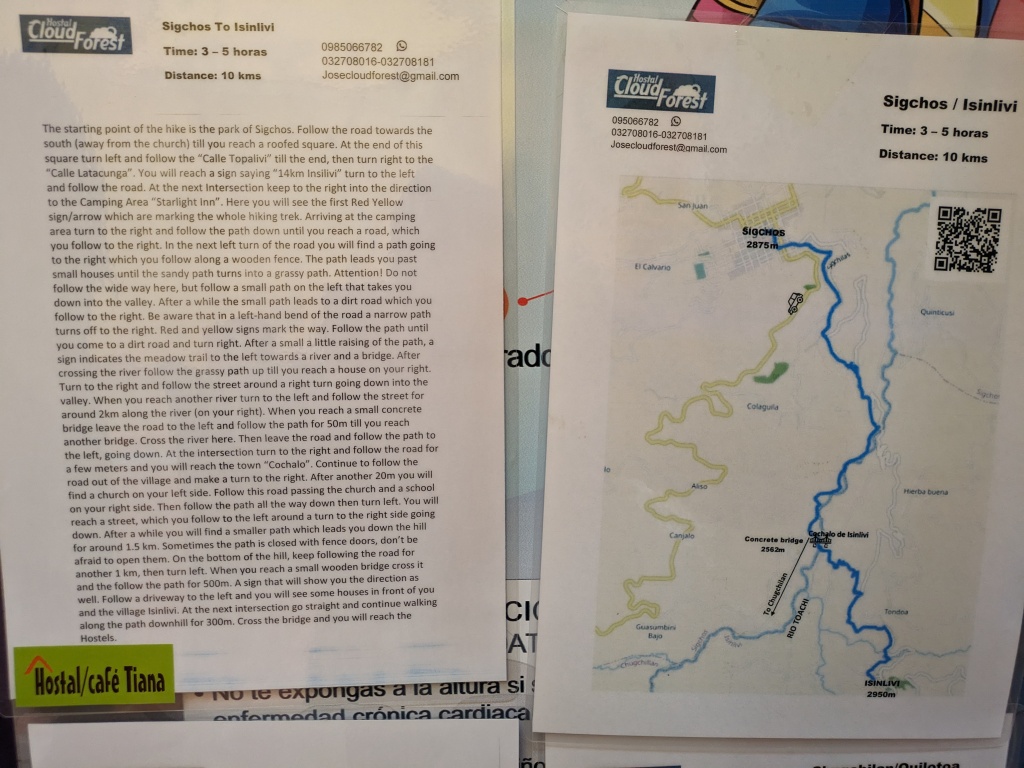
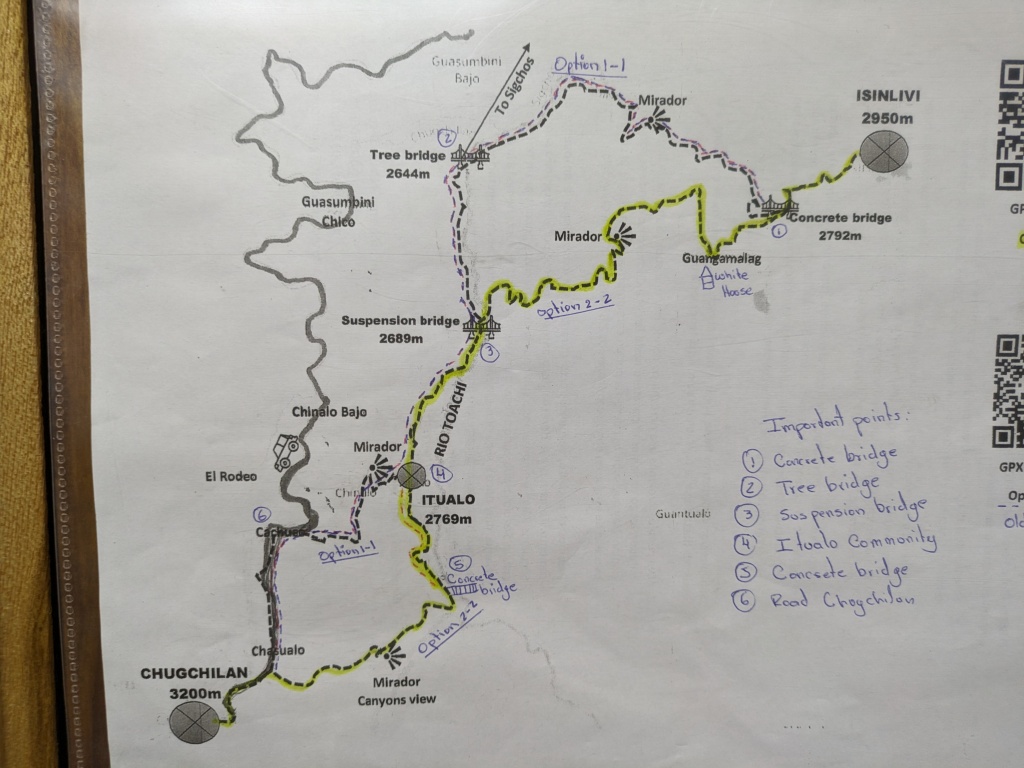
Day 1: From Latacunga, catch a bus north-west to Sigchos (approx 2 hours). Hike from Sigchos to Isinliví (approx 3-5 hours, 10 km, 470 meters elevation gain). Stay overnight in Isinliví.


Day 2: Hike from Isinliví to Chugchilán. Two route options: the ‘old route’ or the ‘new route’. We did the ‘new route’ (approx 4-6 hours, 12 km, 700 meters elevation gain) – the old route is apparently a little bit easier.
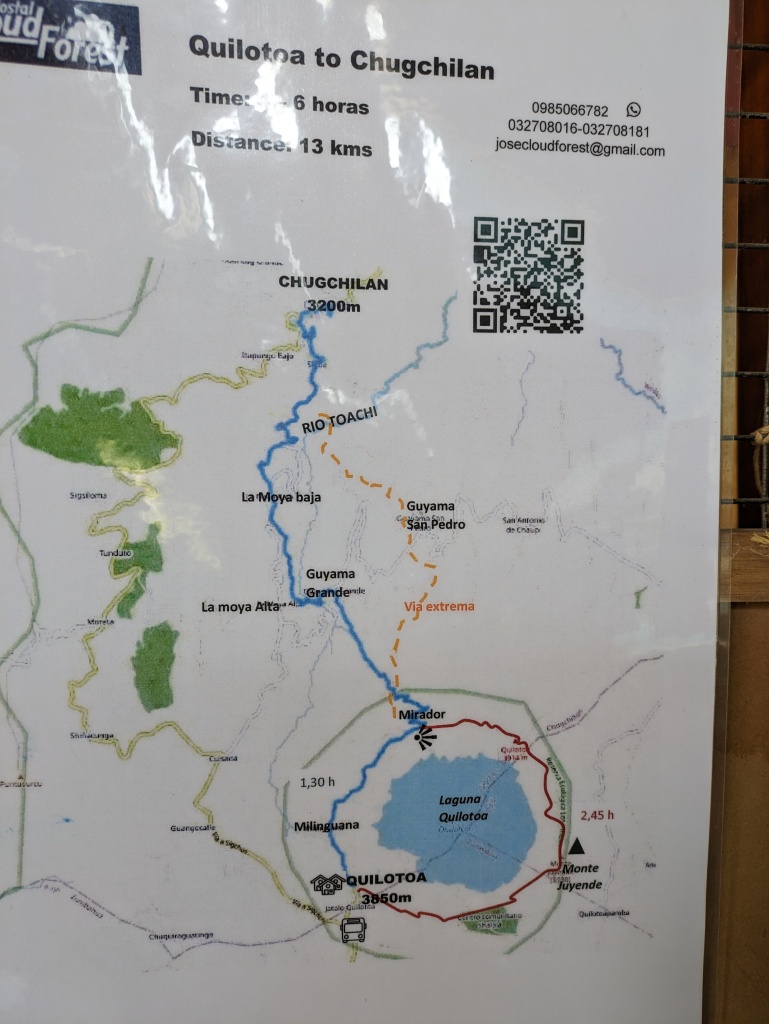
Day 3: Hike from Chugchilán to the top of Quilotoa crater via one of two route options: the standard route, or the ‘via extrema’. While the name sounds intimidating, the via extrema is honestly not at all extreme; it features an additional descent and climb right outside of Chugchilán, meaning it has maybe a few hundred meters more climbing, and is maybe 1 km longer than the standard route. The path is slightly less well marked, so a GPX map is a good idea. The terrain is not scary or extreme, promise.
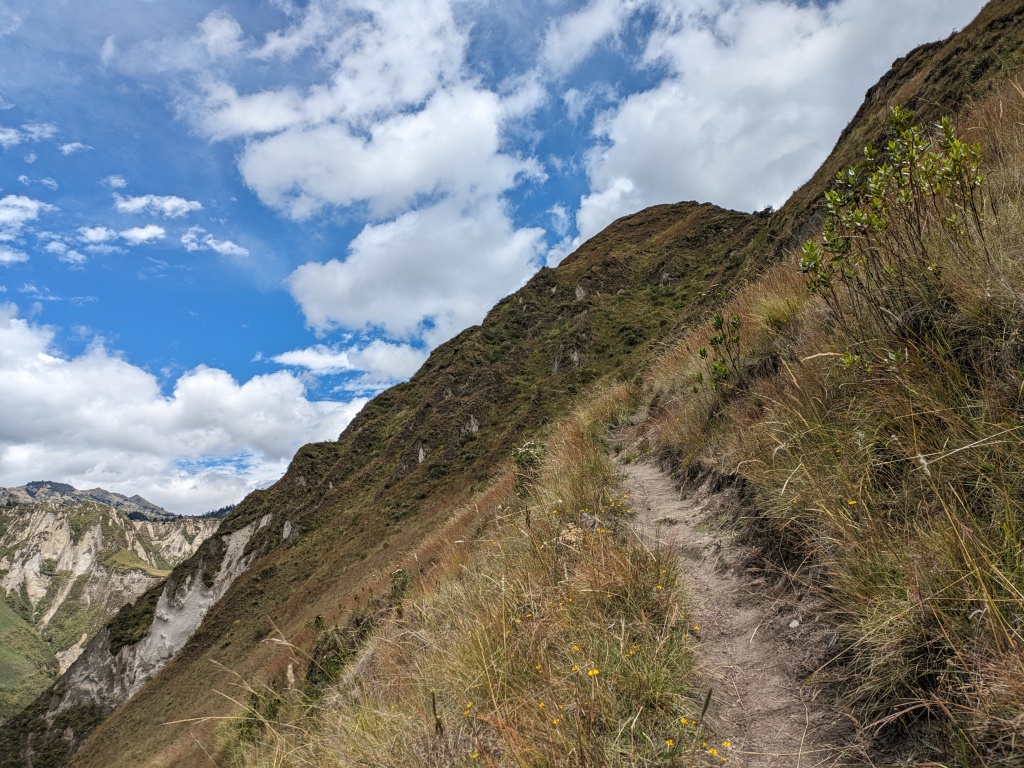
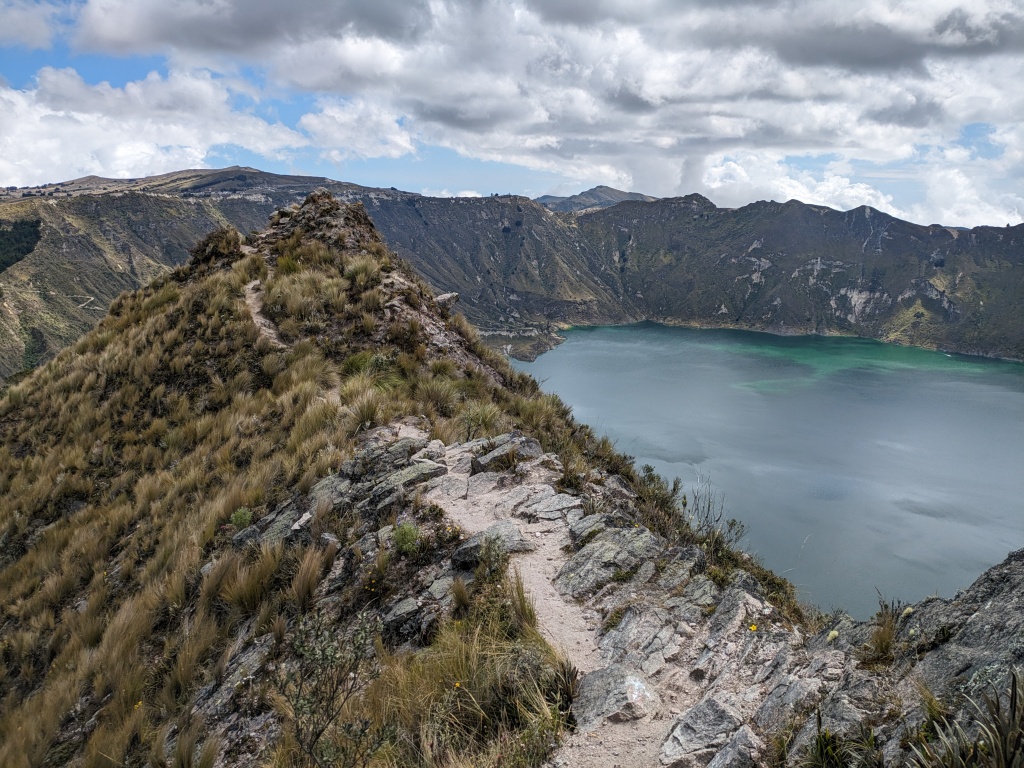
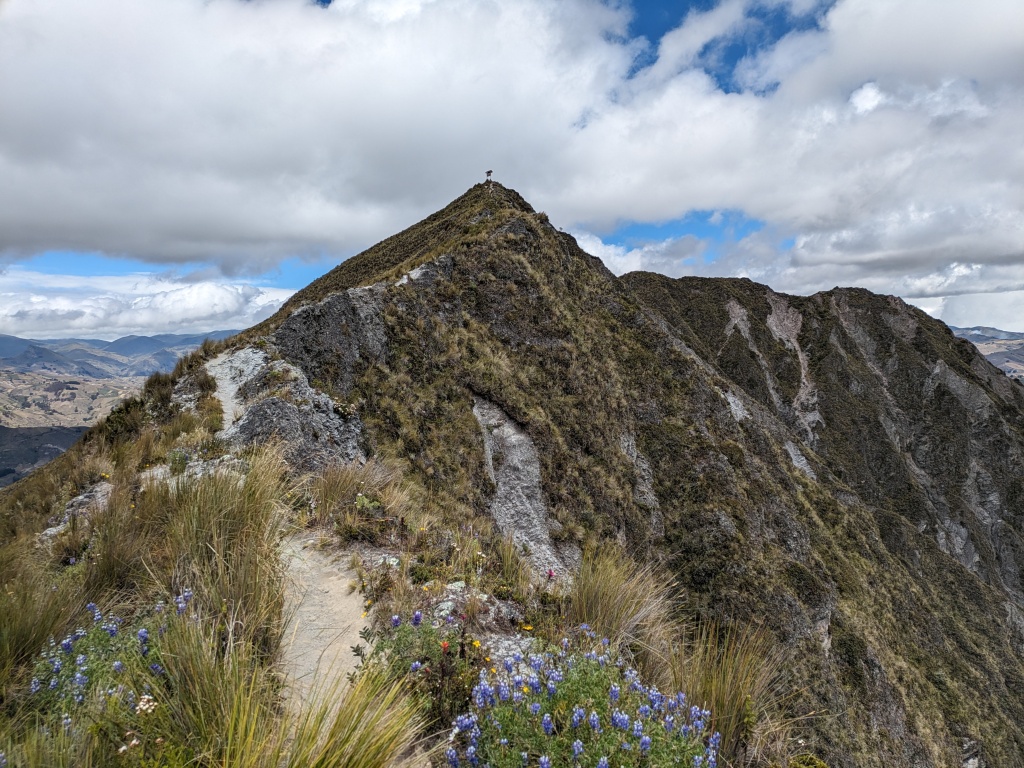
Via extrema and the standard route join up again on the switchbacks to reach the lip of the Quilotoa crater. From here, take either the short route around the crater ridge to the village of Quilotoa (approx 1.5 hours, 3 km) or the long route through the crater summit at 3930 m (approx 2 hrs 45 min, 7 km, with lots of ups and downs) also to Quilotoa village. All told, the standard route plus the short side of the crater rim is about 4-6 hrs, 13 km, 1000 meters gain, while the ‘via extrema’ plus the long side of the crater is about 5-7 hrs, 15 km, 1130 meters gain.
Stay overnight in Quilotoa to enjoy the town, or catch a bus back to Latacunga for the night.
Day 4 (optional): Bus back to Latacunga, if you stayed the night in Quilotoa.
While I’ve listed the most common itinerary above, there are many possible variations to this hike. It can be done across more days, or across less; other towns/side trips could be added; or the route could even be done in reverse (ie: start hiking at Quilotoa, and finish at Sigchos – the benefit of which is that you’d be going downhill most of the way instead of uphill).
How to Start (and Finish)
As buses to the trailhead in Sigchos run from Latacunga, it’s a good idea to travel to Latacunga the night before you plan to begin the hike so you can catch an early bus. There are a number of hostels here that cater to travelers doing the Quilotoa loop; I’d recommend staying in one of these, as they can provide valuable route information, bus schedules, maps, tips, and even hold onto your luggage (whatever you’re not taking hiking for three days) while you’re gone. We stayed at Hostal Cafe Tiana, and would recommend.
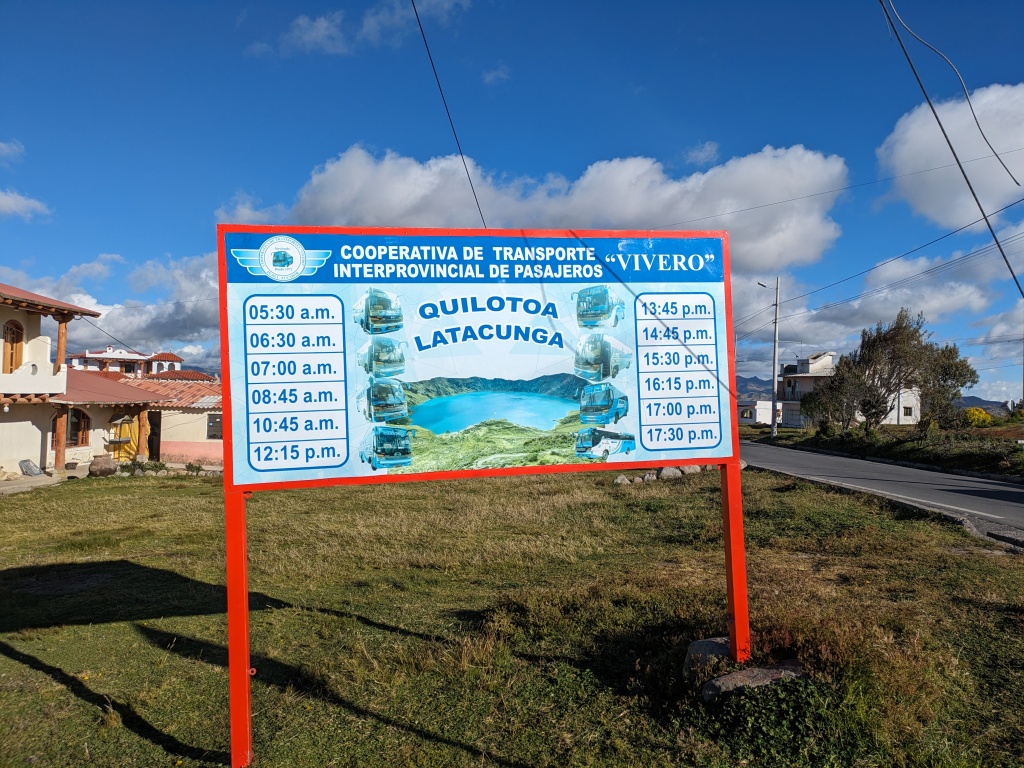
From the main bus terminal in Latacunga, “Terminal Terrestre Latacunga”, enter the main building, and head up the stairs to the ticket windows. Look for a bus heading to Sigchos and purchase your ticket (costs $2.65 USD per person as of July 2023). The bus runs frequently throughout the day (roughly every hour or two). The ride to Sigchos takes about 2 hours. From Sigchos (either the terminal stop or get off near the park in the centre of town), you can stock up on snacks at a tienda (little shop) and begin hiking.

After you’ve finished the hike in Quilotoa, you’ll need to catch a bus back to Latacunga to collect your luggage. We caught the bus at the town gates (across the street from our hostel, but I’m sure you could hop on closer to the centre of town also) – the bus will say “Latacunga” on the front, and you can hop on and pay the attendant when he stops by your seat to collect the fare (roughly $2.50 USD). These buses also run about every hour or two, and will take you back to Terminal Terrestre Latacunga in about 2 hours.
Things to Know Before Starting
-Consider leaving your heavy bags in Latacunga – all you need is a daypack for the hikes. Hostels in Latacunga will hold onto your bags for a fee ($1 USD/day).
-Make reservations for accommodations in advance for the small towns (particularly Isinliví, which only has two hostels). There’s a big range available ($35 USD/night to $100+ US/night) – everything from quaint hostels to quite fancy, with spas.
-Many of the hostels we looked at, including the two we stayed at enroute, included both dinner and breakfast in the price, which is incredibly convenient for your hiking schedule. Also, many offer a bagged lunch for purchase ($2.50-$3 USD) that you can pack for the trail (usually including things like a small sandwich, fruit, chips, cookies, and a bottle of water).
-Bring more water than you think you need for the hiking. Remember the water in Ecuador is not safe to drink – you must have filtered/bottled water only. There will be shops to purchase water, and you can likely fill up with filtered water at your hostels.
-Remember to pack snacks for hiking.
-Get cash beforehand, because there’s no ATMs along the way, and you must pay everything by cash. Aim for $50-100 per day, with some small bills & coins.
-Bring layers, as the sun can be hot but the high altitude air is cold. A coat & toque are nice for Quilotoa also, as it’s cold and windy there.
-GPX tracks are helpful for navigation – you can find these at hostels (QR codes posted on walls will link you to the downloads), but you’ll need an app for you phone to use them. I love Komoot, but some folks use maps.me (I can’t vouch for this one). Hostels will also have written directions, but they’re a little trickier to follow. Enroute, yellow & red signposts will indicate the Quilotoa Loop (but note that not all junctions are marked).
-A general tip for Ecuador: learn some key Spanish phrases before coming, and make sure you’ve got the Spanish Google Translate language pack downloaded on your phone. There is not a whole lot of English.
-Most accommodations will have wifi, but it might not be great, depending on the location – just enough to send some messages, do a tiny bit of research, etc.
-Note that there is an extra tourism fee to enter Quilotoa: $2 USD/person.
-Altitude sickness is a thing. It can strike anywhere above 2500 meters, but will get better the longer you stay at altitude. Drink lots of water to help with acclimatization. When you’re hurting mid-hill, try to go really slow to keep your heartrate as low as possible. Because the climbing on the Quilotoa Loop is done fairly slowly over three days, you probably won’t feel seriously ill (likely just winded on hills and maybe a little headachey), but be aware of more serious symptoms – lightheadedness, dizziness, nausea, and vomiting – and ensure you rest and seek help as needed.
What to Pack
-Clothes for 3-4 days: hiking clothes (t-shirt, shorts or hiking pants depending on weather), warm layers (for chilly winds and cold nights), hostel clothes (you’ll want to get out of your sweaty hiking clothes to keep warm)
-Warm socks (the hostel floors can be very cold at night!)
-Warm coat, sweater, and hat/toque for Quilotoa
-Hiking/running shoes or boots – we wore trail runners and were very happy with our choice. Full hiking boots probably aren’t necessary unless you’re hiking during the rainy season (in which case, you’ll encounter lots of mud)
-Sunscreen, sunglasses, & hat
-Shampoo, toothbrush/toothpaste, other personal toiletries
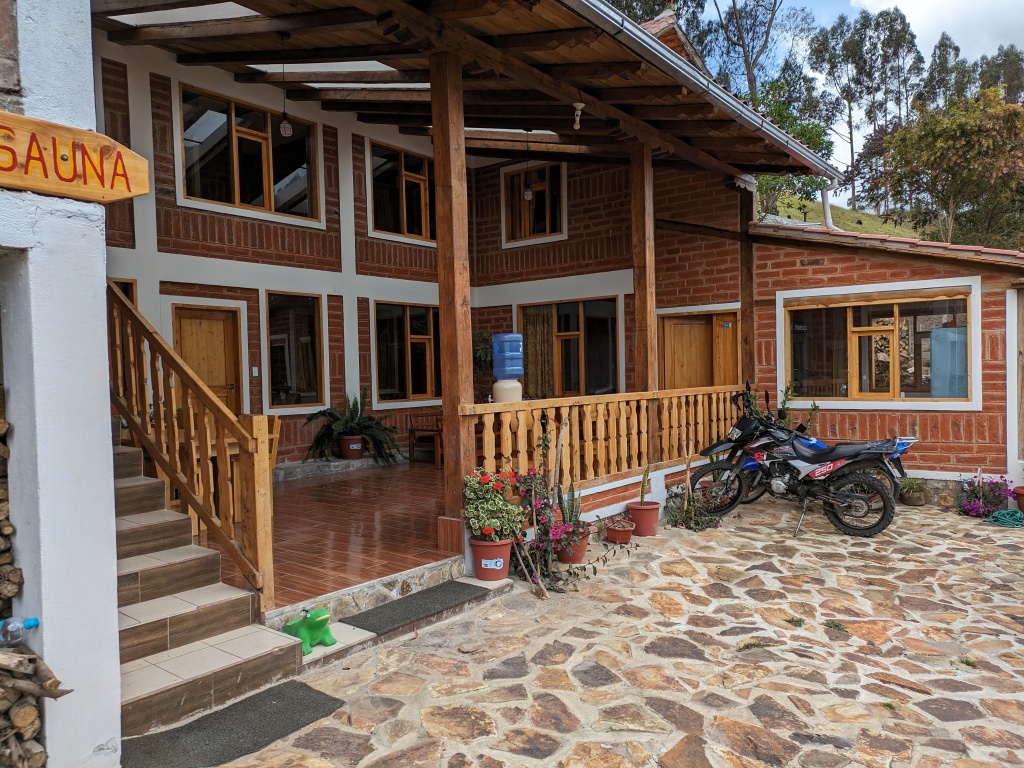
-A bathing suit – some of the more expensive hostels along the way offer saunas to soothe sore muscles after a hard day’s hike (often for an extra fee however)
-Water bottle – most hostels seemed to have filtered water to fill your bottle. There are also some small shops around from which you can buy bottled water.
-A book, or something to keep you occupied after your day of hiking
-Cash, passport number (for hostel registration)
-Cell phone & charging cable (for photos and navigation)
-What you won’t need: a towel (hostels provide this), soap (at hostels), sandals (too cold for sandals)
Some trip highlights
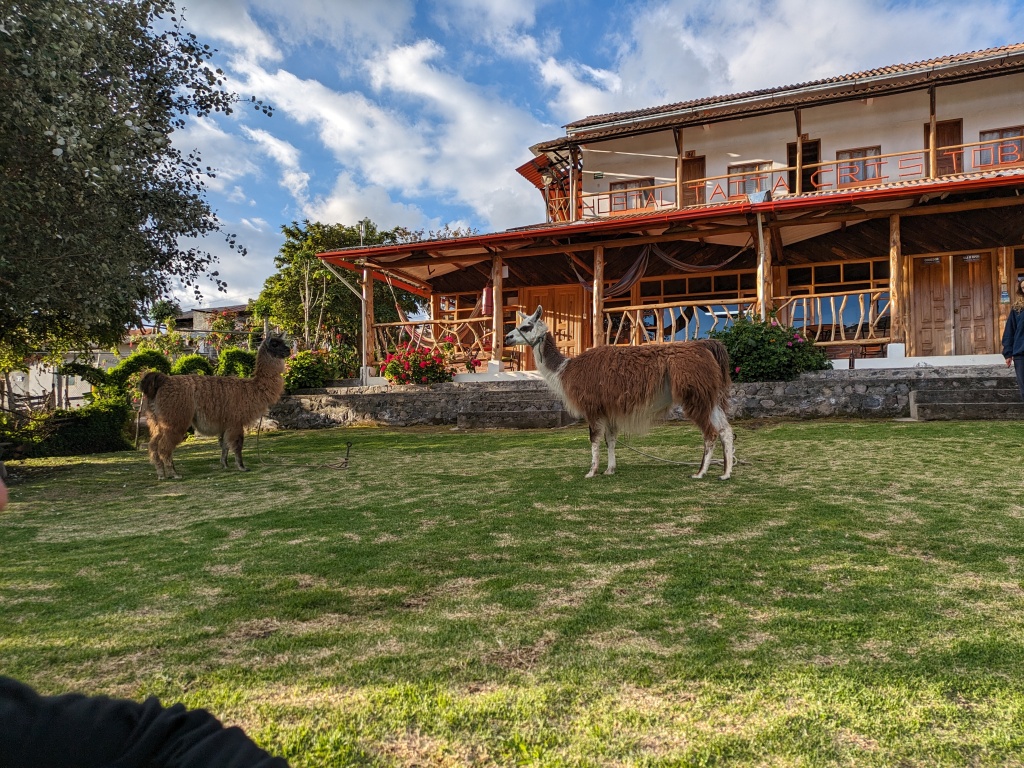
-The hostels: Hostal Taita (Isinliví), Cloud Forest (Chugchilán), and Green Lake (Quilotoa). In contrast to most other hiking trips I’ve done, it was amazing to have a hot shower and soft bed at the end of the day, plus hammocks, games, woodstoves, and other comforts.
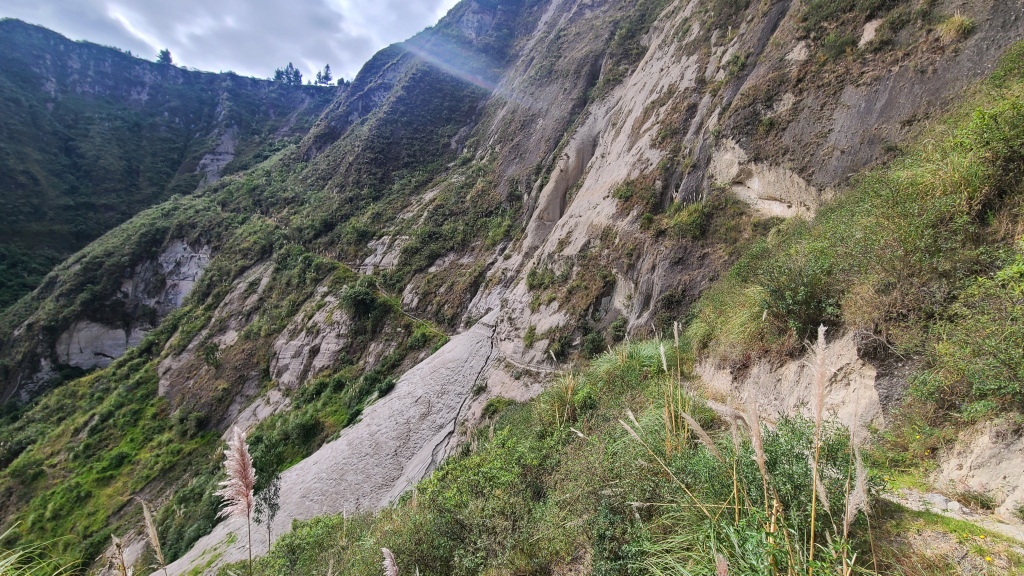
-The exciting drive to Sigchos, full of hairpin turns and steep drops into river canyons.
-Playing pool in the huge games room at Cloud Forest hostel.
-Chatting with other travelers at dinner and breakfast.
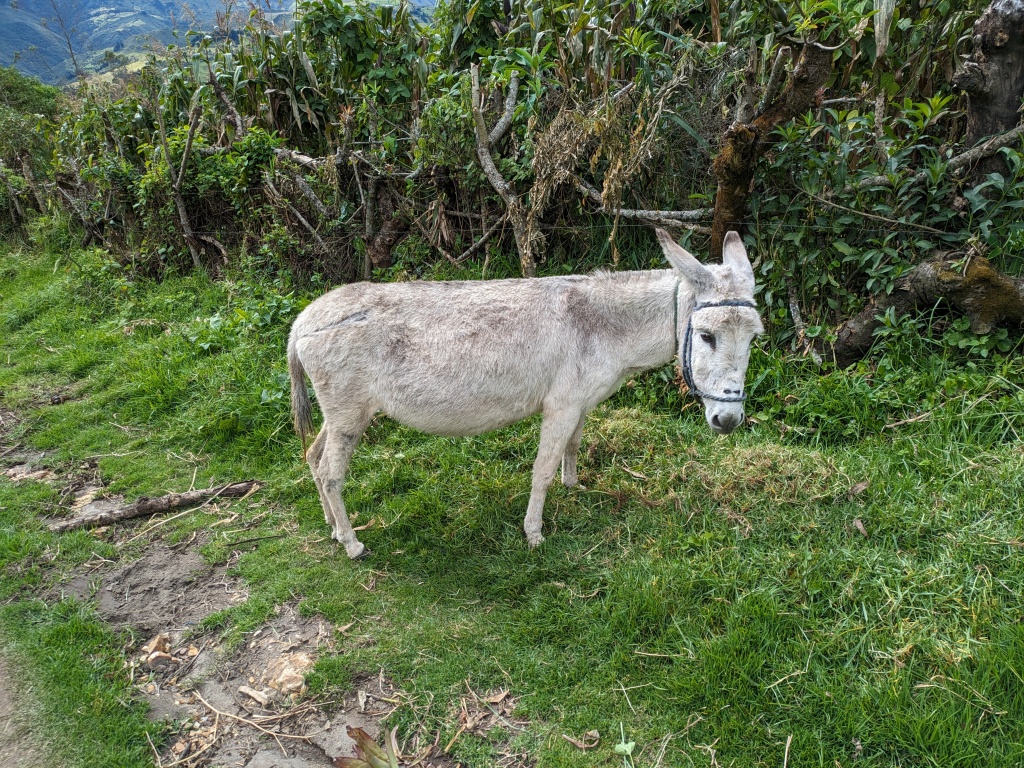
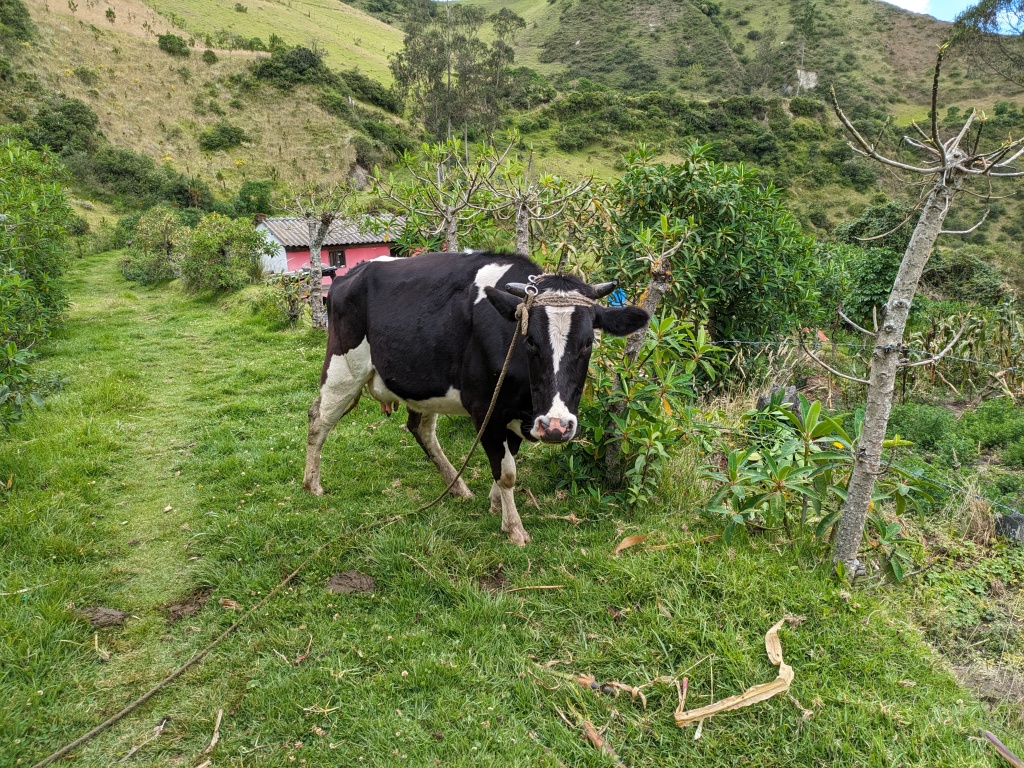
-The many animals we encountered: llamas, cows, goats, pigs, dogs, cats, horses, donkeys, sheep, baby lambs, and a teeny tiny wiener dog.
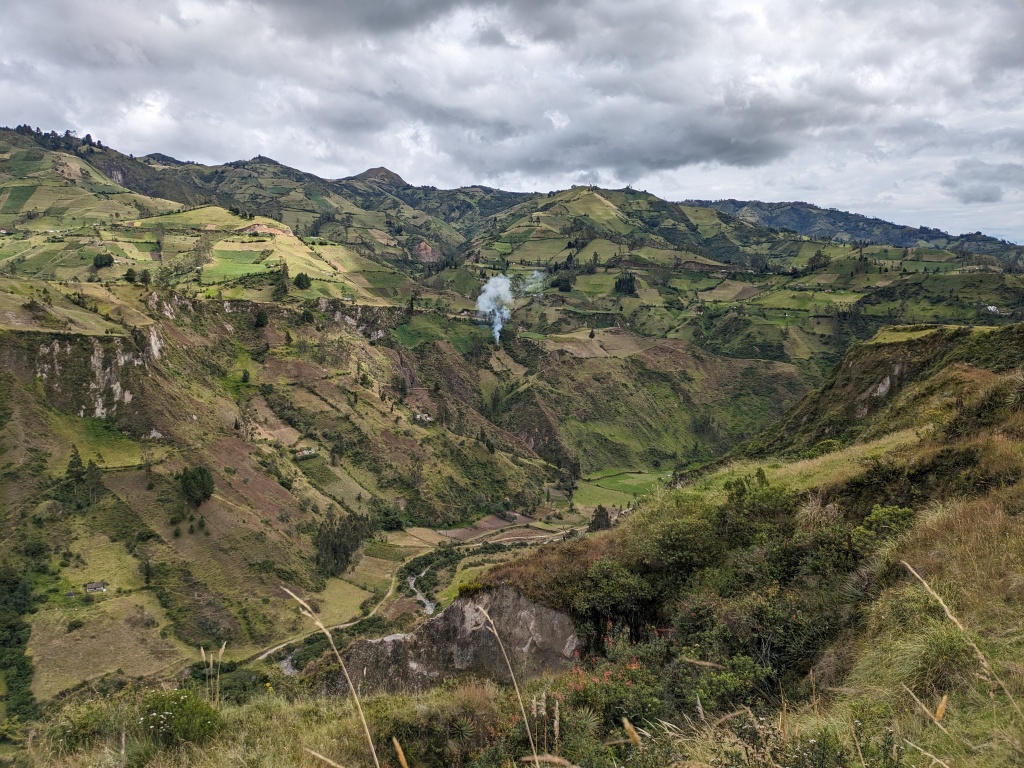
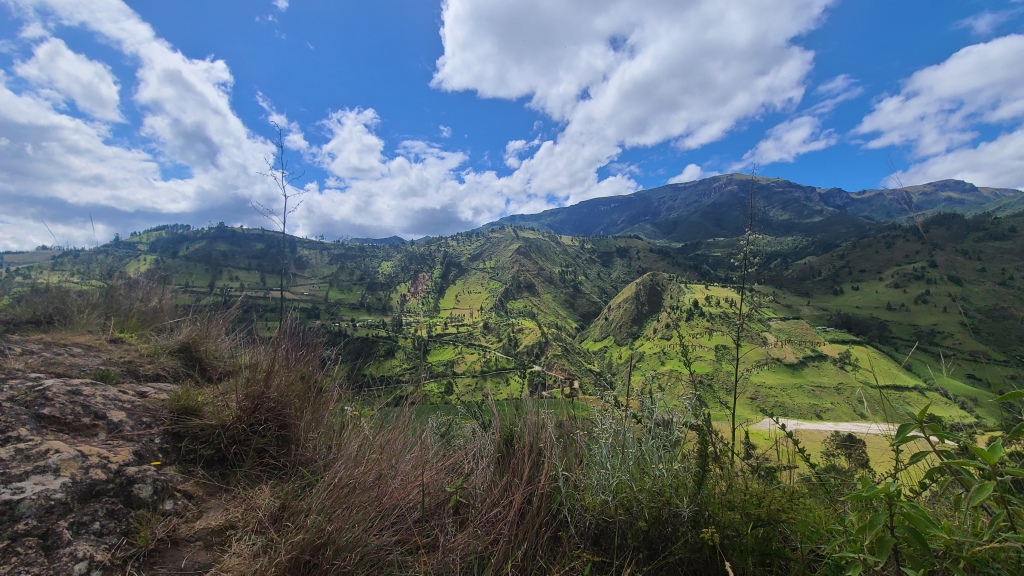
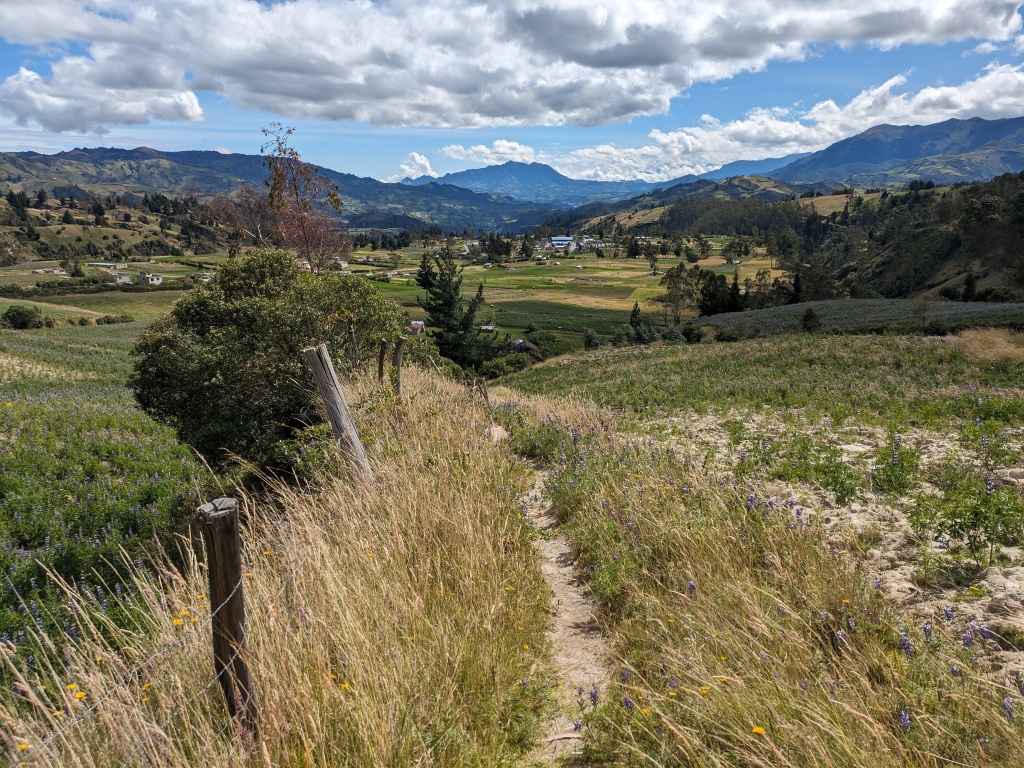
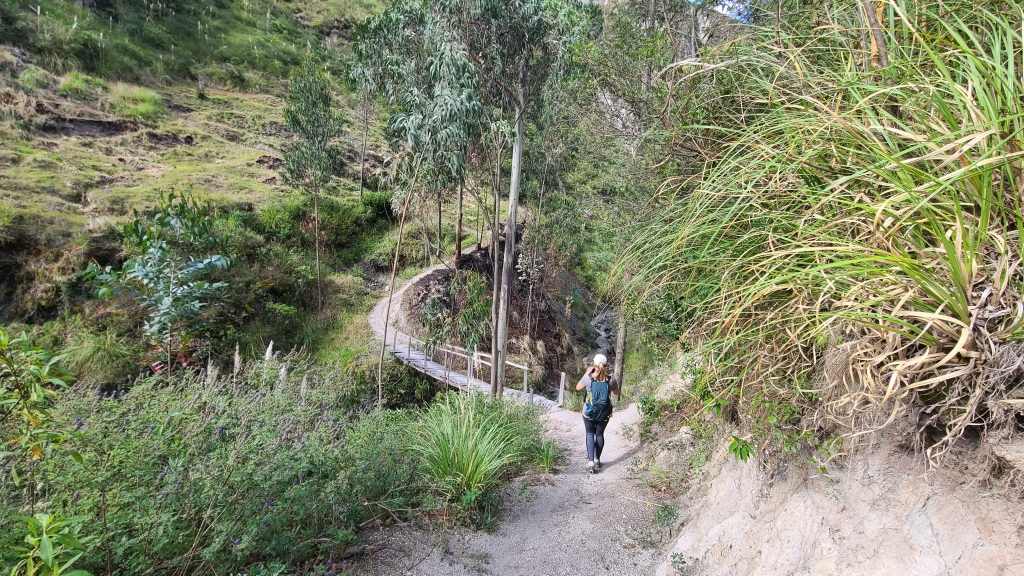
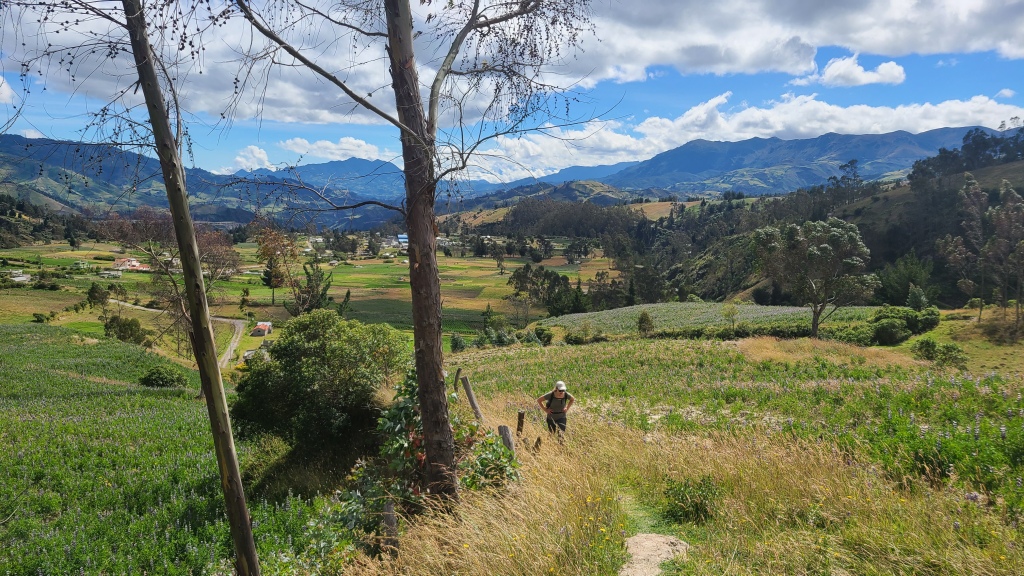
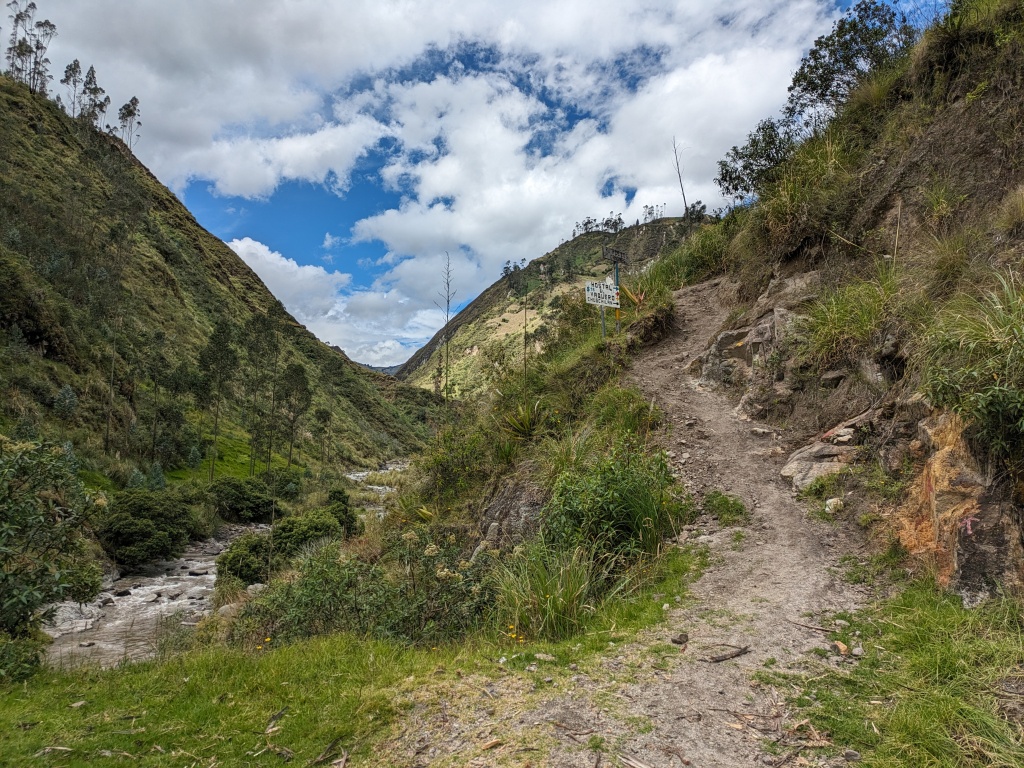
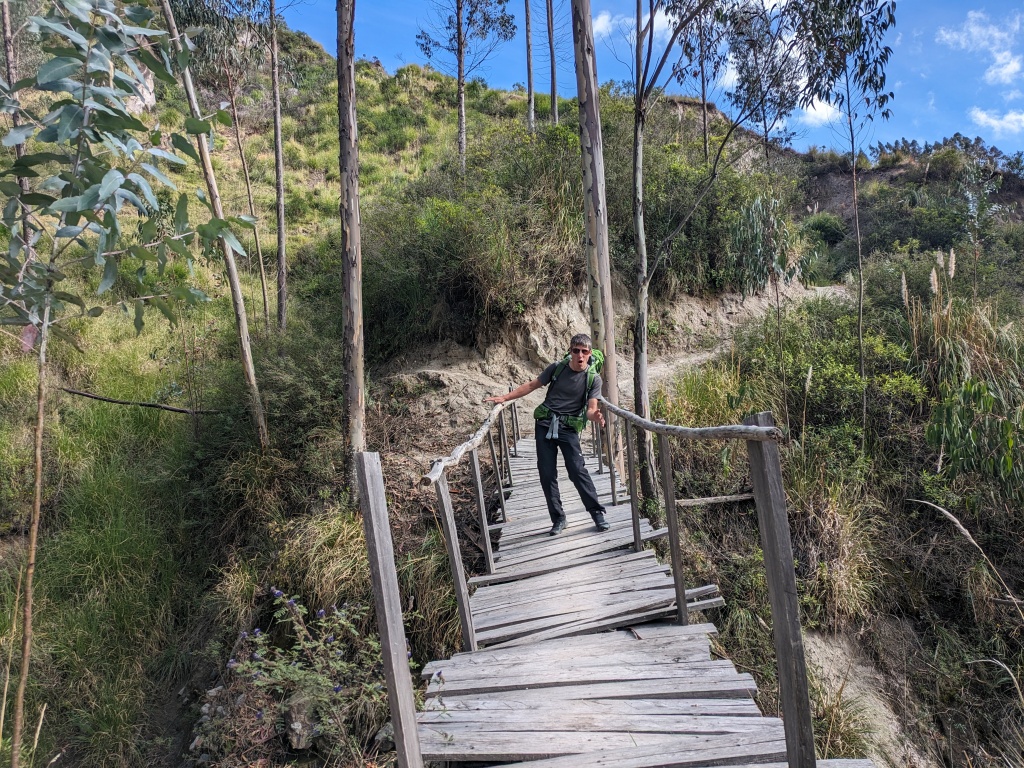
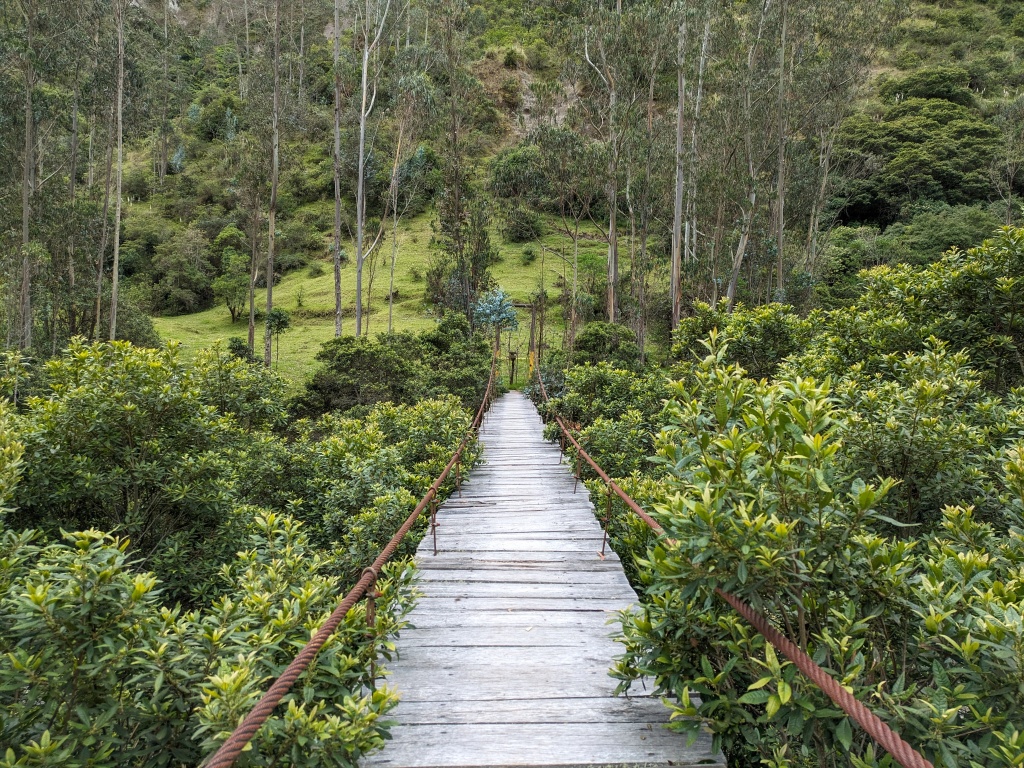
-The canyons (the Ruta De Los Canyones on day 2), the numerous rivers and sketchy bridges, the picturesque patterned farmlands, the aquamarine volcanic crater lake, and the bursts of wildflowers absolutely everywhere.
-Stopping for homemade banana bread at a stand set up by a man and his son.
-A cool suspension bridge on day 2 (on the “new route”).
-The food. A standard Ecuadorian breakfast consists of scrambled eggs, fresh fruit, bread, homemade jam, tea or coffee, and fresh-squeezed fruit juice. A standard dinner is soup, meat, rice, salad, and a small dessert or fruit. Some other notable things we encountered: lemon verbena tea (yum!), chicken-flavoured chips (not so yum), and Manicha (Ecuadorian chocolate-peanut bars).
-A clear night in Isinliví, watching the inverted constellations and dry lightning flashes over the distant hills.
-Slightly bad-tempered llamas at the Hostal Taita. They nipped a couple times and knocked a girl over.
-A huge smile and hug from a sweet Ecuadorian farmer lady when we passed her on the road.
-The lung bustin’ climbs up the ‘lava dome’ hills on the crater rim trail. While the rolling trail really isn’t that hard, it feels ten times more challenging with limited oxygen.
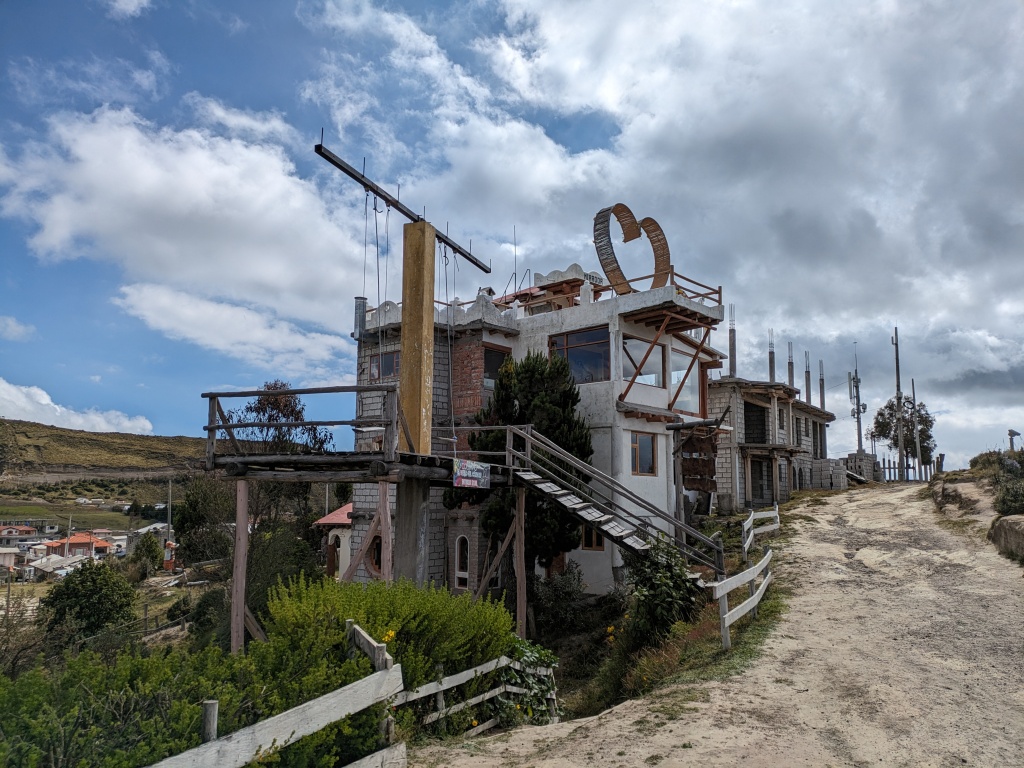
-Checking out the tourist town of Quilotoa. The town is full of restaurants, gift shops, and lake viewpoints, including an epic lake adventure swing. Make sure you try the canelazo, a hot cinnamon drink made with aguardiente (cane sugar alcohol), while you’re there.
Ever heard of the Quilotoa loop? What are your favourite international destinations for multi-day hikes? Let me know in the comments below!
